By: Team DukeCooks Since: Oct 2019 Licence: MIT
- 1. Introduction
- 2. Setting up
- 3. Design
- 4. Implementation
- 5. Documentation
- 6. Testing
- 7. Dev Ops
- Appendix A: Product Scope
- Appendix B: User Stories
- Appendix C: Use Cases
- Appendix D: Non Functional Requirements
- Appendix E: Glossary
- Appendix F: Instructions for Manual Testing
- F.1. Launch and Shutdown
- F.2. Adding a recipe
- F.3. Deleting a recipe
- F.4. Editing a recipe
- F.5. Adding a meal plan
- F.6. Deleting a meal plan
- F.7. Editing a meal plan
- F.8. Adding a task
- F.9. Deleting a task
- F.10. Editing a task
- F.11. Adding a diary
- F.12. Deleting a diary
- F.13. Editing a diary
- F.14. Deleting a page
- F.15. Deleting an exercise
- F.16. Saving data
1. Introduction
DukeCooks is a revolutionary lifestyle application, specially designed for health-conscious students. Targeting busy students that are long-time users of the Command-Line Interface (CLI), DukeCooks offers such users a CLI healthy lifestyle application. This means, expert-CLI student users will be able to execute different commands, all within a single line. They will be able to manage various aspects of their lifestyle, from their diet, to exercises and health records.
They can use DukeCooks to manage all their lifestyle needs, all within one single app.
With DukeCooks, being healthy has never been easier!
1.1. Purpose
This developer guide aims to provide you with both the technical and non-technical aspects of DukeCooks. It also provides insight into the future direction of DukeCooks. After reading this document, you should be able to understand the design, architecture and goals of DukeCooks.
1.2. Understanding the document
| Pro tips which you may find useful. |
| Information that you should take note of. |
| Information that you should be careful with. |
Model
|
Text with orange highlight (also known as mark-up) indicates a class / package name. |
Model.java
|
Italic text with mark-up indicates a file name / github link. |
2. Setting up
2.1. Prerequisites
-
JDK
11or above -
IntelliJ IDE
IntelliJ by default has Gradle and JavaFx plugins installed.
Do not disable them. If you have disabled them, go toFile>Settings>Pluginsto re-enable them.
2.2. Setting up the project in your computer
-
Fork this repo, and clone the fork to your computer
-
Open IntelliJ (if you are not in the welcome screen, click
File>Close Projectto close the existing project dialog first) -
Set up the correct JDK version for Gradle
-
Click
Configure>Project Defaults>Project Structure -
Click
New…and find the directory of the JDK
-
-
Click
Import Project -
Locate the
build.gradlefile and select it. ClickOK -
Click
Open as Project -
Click
OKto accept the default settings.
2.3. Verifying the setup
-
Run the
dukecooks.Mainand try a few commands -
Run the tests to ensure they all pass.
2.4. Configurations to do before writing code
2.4.1. Configuring the coding style
This project follows oss-generic coding standards. IntelliJ’s default style is mostly compliant with ours but it uses a different import order from ours. To rectify,
-
Go to
File>Settings…(Windows/Linux), orIntelliJ IDEA>Preferences…(macOS) -
Select
Editor>Code Style>Java -
Click on the
Importstab to set the order-
For
Class count to use import with '*'andNames count to use static import with '*': Set to999to prevent IntelliJ from contracting the import statements -
For
Import Layout: The order isimport static all other imports,import java.*,import javax.*,import org.*,import com.*,import all other imports. Add a<blank line>between eachimport
-
Optionally, you can follow the UsingCheckstyle.adoc document to configure Intellij to check style-compliance as you write code.
2.4.2. Updating documentation to match your fork
After forking the repo, the documentation will still have the DukeCooks branding and refer to the AY1920S1-CS2103T-T10-2/main repo.
If you plan to develop this fork as a separate product (i.e. instead of contributing to AY1920S1-CS2103T-T10-2/main), you should do the following:
-
Configure the site-wide documentation settings in
build.gradle, such as thesite-name, to suit your own project. -
Replace the URL in the attribute
repoURLinDeveloperGuide.adocandUserGuide.adocwith the URL of your fork.
2.4.3. Setting up CI
Set up Travis to perform Continuous Integration (CI) for your fork. See UsingTravis.adoc to learn how to set it up.
After setting up Travis, you can optionally set up coverage reporting for your team fork (see UsingCoveralls.adoc).
| Coverage reporting could be useful for a team repository that hosts the final version but it is not that useful for your personal fork. |
Optionally, you can set up AppVeyor as a second CI (see UsingAppVeyor.adoc).
| Having both Travis and AppVeyor ensures your App works on both Unix-based platforms and Windows-based platforms (Travis is Unix-based while AppVeyor is Windows-based) |
2.4.4. Getting started with coding
When you are ready to start coding, we recommend that you get some sense of the overall design by reading about DukeCooks’s architecture.
3. Design
3.1. Architecture
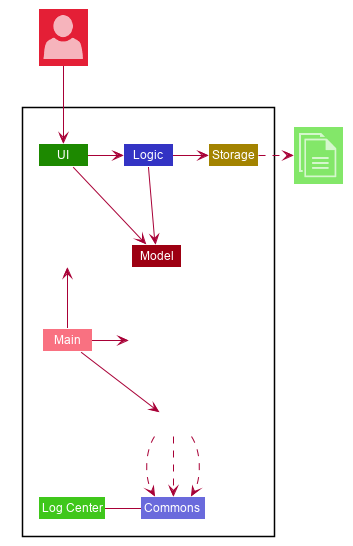
The Architecture Diagram given above explains the high-level design of the App. Given below is a quick overview of each component.
The .puml files used to create diagrams in this document can be found in the diagrams folder.
Refer to the Using PlantUML guide to learn how to create and edit diagrams.
|
-
At app launch: Initializes the components in the correct sequence, and connects them up with each other.
-
At shut down: Shuts down the components and invokes cleanup method where necessary.
Commons represents a collection of classes used by multiple other components.
The following class plays an important role at the architecture level:
-
LogsCenter: Used by many classes to write log messages to the App’s log file.
The rest of the App consists of four components.
Each of the four components
-
Defines its API in an
interfacewith the same name as the Component. -
Exposes its functionality using a
{Component Name} Managerclass.
For example, the Logic component (see the class diagram given below) defines it’s API in the Logic.java interface and exposes its functionality using the LogicManager.java class.

Interaction of architecture components
The Sequence Diagram below shows how the components interact with each other for the scenario where the user issues the command delete recipe 1.
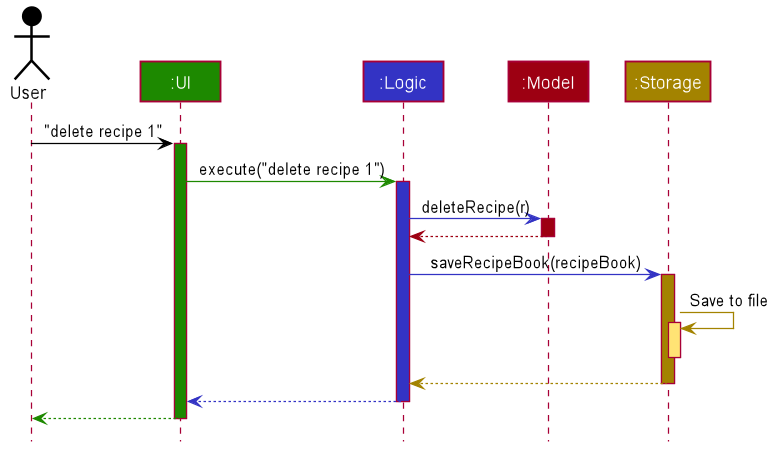
delete recipe 1 commandThe sections below give more details of each component.
3.2. UI component
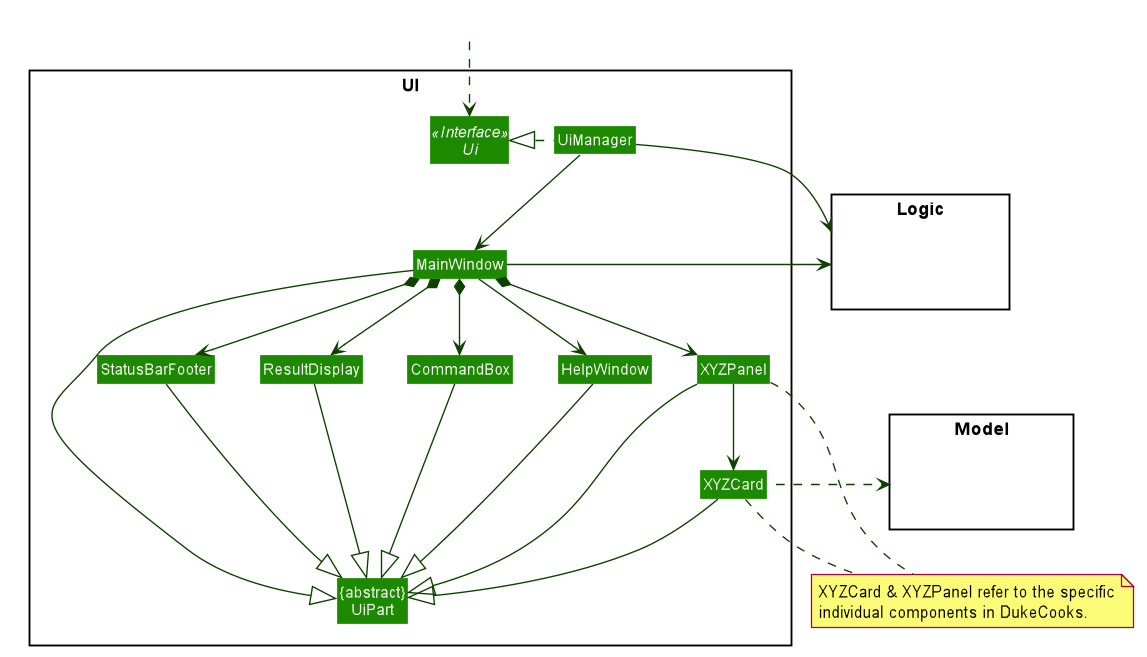
API : Ui.java
The UI consists of a MainWindow that is made up of parts e.g.CommandBox, ResultDisplay, XYZListPanel, StatusBarFooter etc. All these, including the MainWindow, inherit from the abstract UiPart class.
|
XYZListPanel refers to the 6 different individual components in our application. The 6 different components are:
|
The UI component uses JavaFx UI framework. The layout of these UI parts are defined in matching .fxml files that are in the src/main/resources/view folder. For example, the layout of the MainWindow is specified in MainWindow.fxml
The UI component,
-
Executes user commands using the
Logiccomponent. -
Listens for changes to
Modeldata so that the UI can be updated with the modified data.
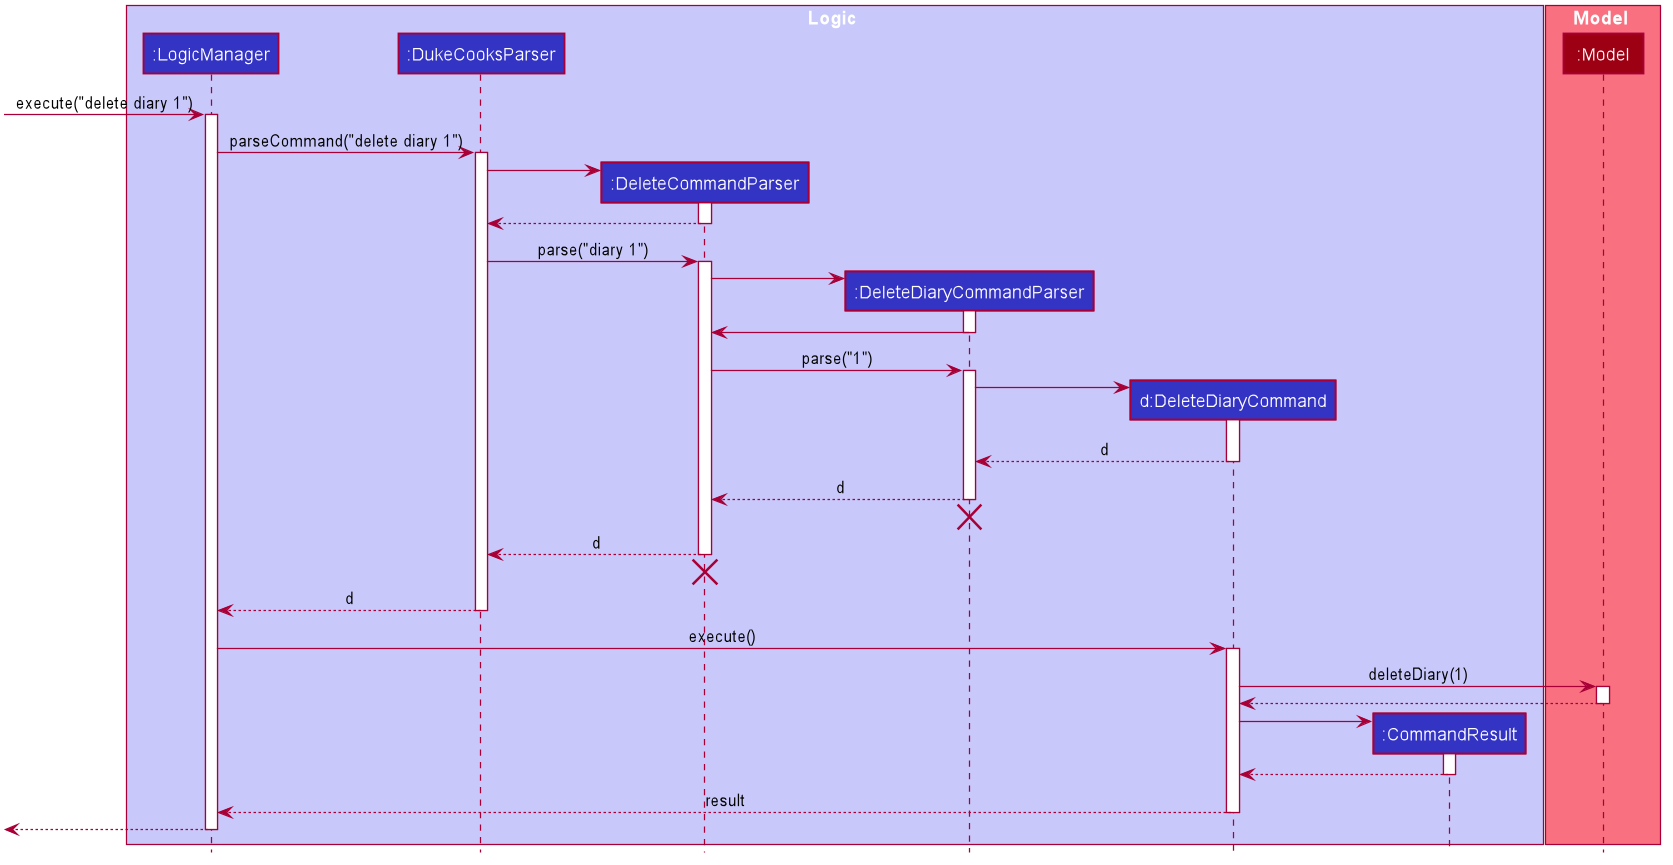
3.3. Logic component
API :
Logic.java
-
Logicuses theDukeCooksParserclass to parse the user command. -
This results in a
Commandobject which is executed by theLogicManager. -
The command execution can affect the
Model(e.g. adding a recipe). -
The result of the command execution is encapsulated as a
CommandResultobject which is passed back to theUi. -
In addition, the
CommandResultobject can also instruct theUito perform certain actions, such as displaying help to the user.
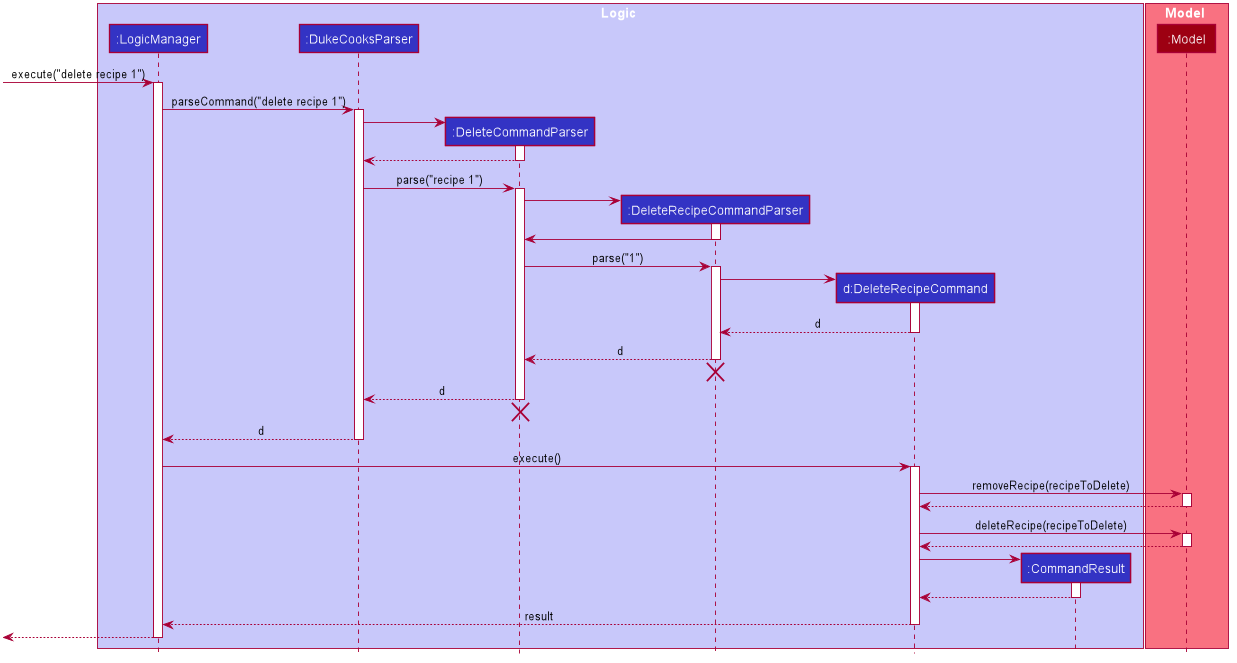
Given below is the Sequence Diagram for simplified interactions within the Logic component for the execute("delete recipe 1") API call.
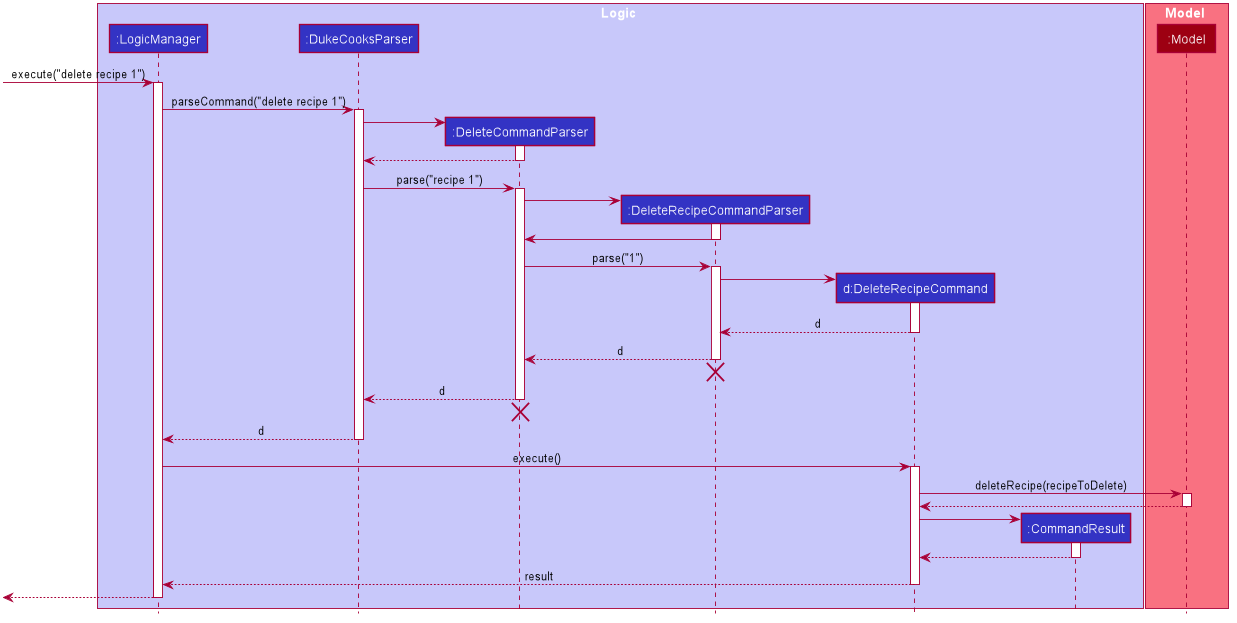
delete recipe 1 Command
The lifeline for DeleteCommandParser should end at the destroy marker (X) but due to a limitation of PlantUML, the lifeline reaches the end of diagram.
|
3.4. Model component
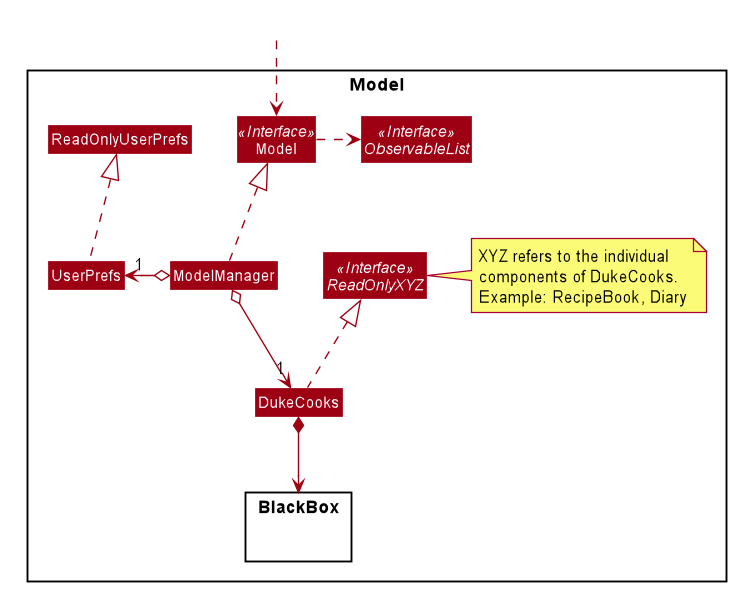
API : Model.java
The Model,
-
stores a
UserPrefobject that represents the user’s preferences. -
stores the Duke Cooks data.
-
exposes an unmodifiable
ObservableList<XYZ>that can be 'observed' e.g. the UI can be bound to this list so that the UI automatically updates when the data in the list change. -
does not depend on any of the other three components.
-
BlackBox refers to the model diagram of the individual components of DukeCooks.
|
XYZ refers to the 5 different individual components in our application. The 5 different components are:
|
3.5. Storage component
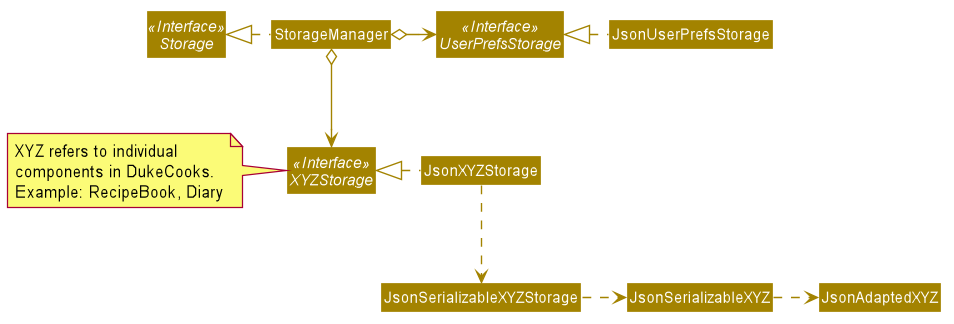
API : Storage.java
The Storage component,
-
can save
UserPrefobjects in json format and read it back. -
can save the DukeCooks data in json format and read it back.
3.6. Common classes
Classes used by multiple components are in the dukecooks.commons package.
4. Implementation
This section describes some noteworthy details on how certain features are implemented.
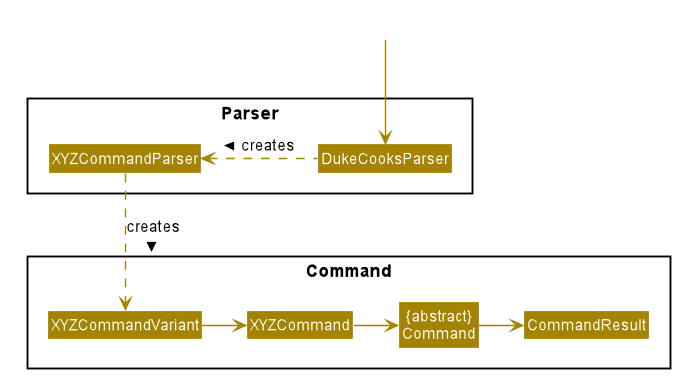
4.1. Commands and Parser
All command variants (i.e AddRecipeCommand, AddExerciseCommand) extends from AddCommand,
instead of the abstract Command class.
This applies to other type of commands as well, such as DeleteCommand and EditCommand.
The diagram below shows a simplified class diagram for Commands and Parser.
4.1.1. Design Considerations
| Aspect | Option 1 (Chosen) | Option 2 |
|---|---|---|
Implementing commands and parser |
Command variants (i.e Pros Cons Our Choice |
Command variants extend from Pros Cons |
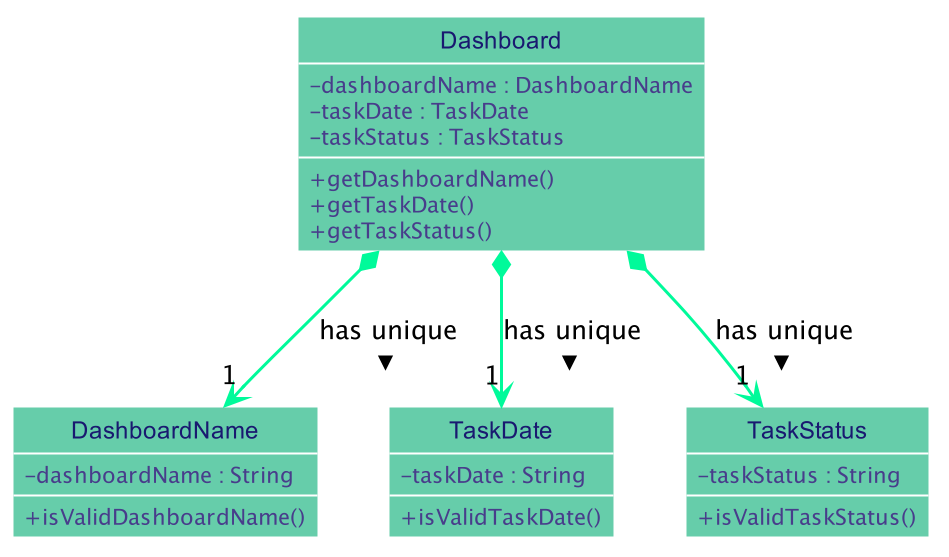
4.2. Dashboard feature
In DukeCooks, a Dashboard object represents an event a user needs to attend to, a task. A Dashboard is made up of
a DashboardName, TaskDate and TaskStatus. Below is a class diagram (Figure 10) that illustrates how Dashboard interacts with other classes.
4.2.1. Implementation
The functions add/delete/edit/find/list/done task, are found under the Dashboard.
The Dashboard in DukeCooks serves as a homepage which displays a list of tasks set out
by the user. The tasks are sorted accordingly by earliest date; using a custom sorting algorithm.
Here, a task is represented by a Dashboard object.
The operations are as followed:
-
add task— Adds and saves the task intoDukeCooks. -
delete task— Removes the specified task fromDukeCooks. -
edit task— Edits the specified with a new task name and/or date. -
done task— Marks a task as complete. -
find task— Finds a list of task with a given keyword. -
list taskincomlete— Lists all the incomplete tasks. -
list taskcomlete— Lists all the completed tasks. -
goto dashboard— Directs user to the dashboard window.
These operations are exposed in the Model interface as addDashboard(),
deleteDashboard(), setDashboard(), Model#hasDashboard() , doneDashboard and
getDashboardRecords().
Given below is an example usage scenario and how the add/delete/edit/find/done/dashboard mechanism behaves at each step.
Step 1. The user is currently at a another part of DukeCooks and wants to go to the Dashboard. The
user executes the goto dashboard command. The goto dashboard command calls getDashboardRecords(),
which returns the ReadOnlyDashboard that returns the UniqueDashboardList, iterating over all the task and displaying it on the
homepage.
Step 2. The user executes add task tn/bake a cake td/12/12/2019 command to add a new
task into DukeCooks. The add command calls addDashboard(), causing the task to
be added into UniqueDashboardList. In UniqueDashboardList, it calls`add()` which will call sortDashboard().
At this stage, the list of task is sorted by date. After which, the add command also calls saveDashboard() to be
saved the goto dashboard into the UniqueDashboardList.
Step 3. The user executes delete task 3 command to delete the 3rd task in the
dashboard. The delete command calls deleteDashboard() causing the specified task
to be removed from UniqueDashboardList. In UniqueDashboardList, it calls
remove() which will call sortDashboard(). At this
stage, the list of task is sorted by date. Also, it calls saveDashboard(),
after the delete task 3 command executes
to be saved in the UniqueDashboardList.
Step 4. The user executes edit task… command to edit a field in a task. The edit
command calls setDashboard() causing the edited task to be updated in
UniqueDashboardList. In UniqueDashboardList, it calls setDashboard()
which will call sortDashboard(). At this stage, the list of task is
sorted by date. Also, it calls saveDashboard(), after the edit task… command executes to be saved into the UniqueDashboardList
Step 5. The user executes find task… command to find a list of task given a keyword.
The find command calls hasDashboard(), which searches through the
UniqueDashboardList for tasks containing the particular keyword.
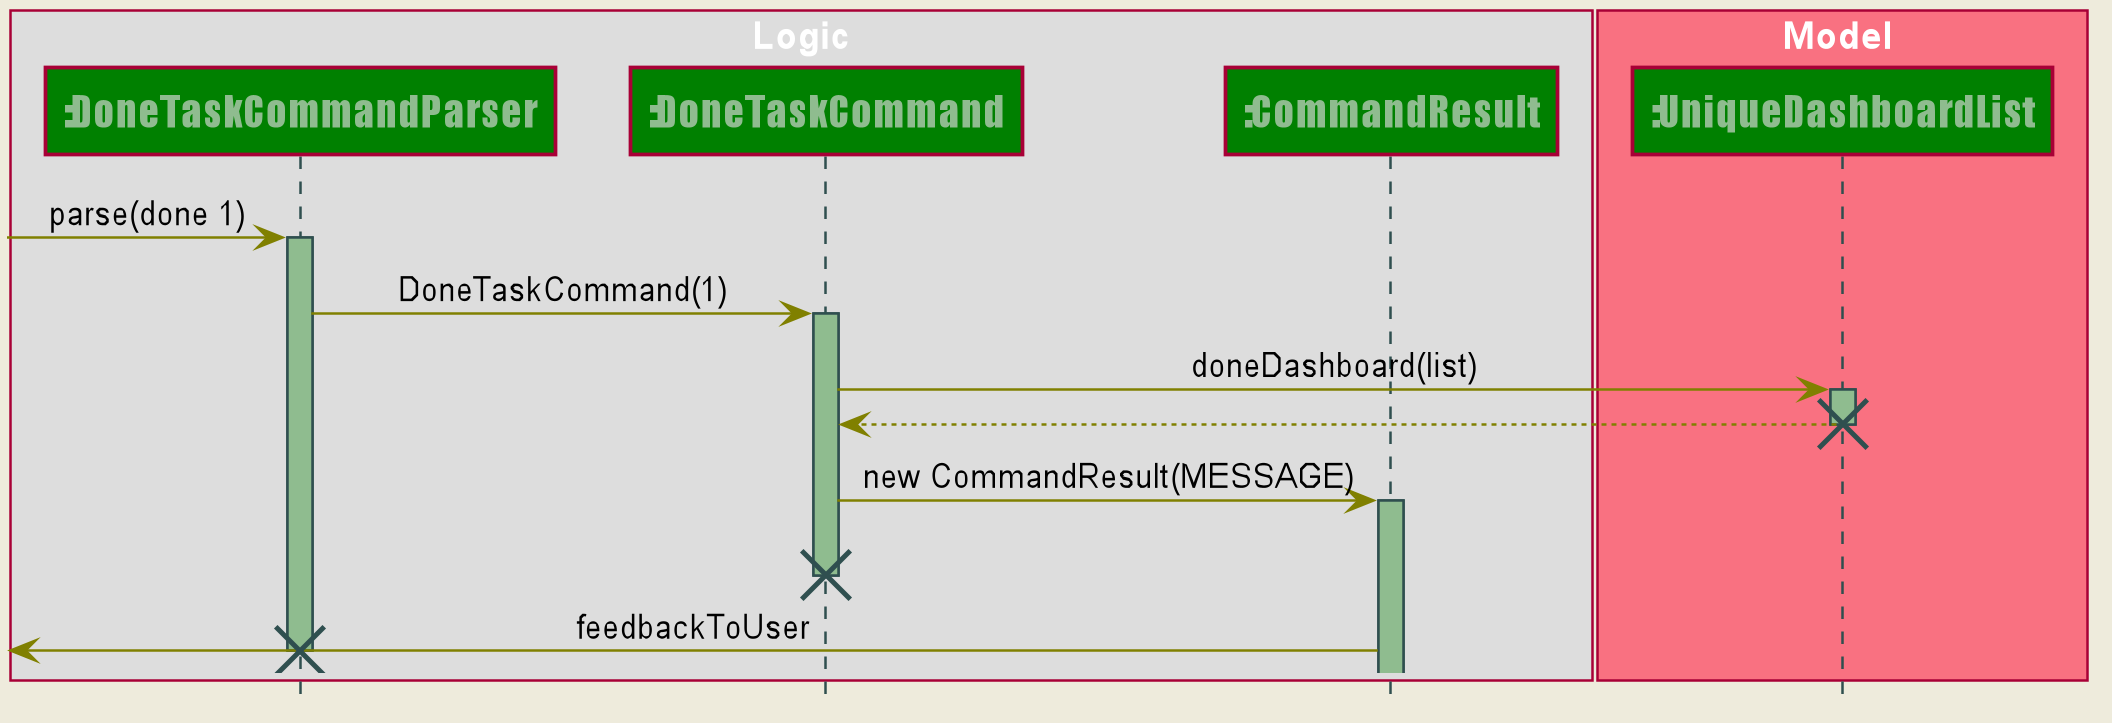
Step 6. The user executes done task 1 command to mark the first task in the list as complete. The done task
command calls doneDashboard(), which will cause the task to be marked as complete in the
UniqueDashboardList. In UniqueDashboardList, it calls done(), which adds
the newly created Dashboard object and adds it into the list. After which, sortDashboard()
is called to sort the list by date and reflect the newly made changes.
The following sequence diagram (Figure 11) shows how the done operation works:
4.2.2. Making Decisions
| Aspect | Option 1 (Chosen) | Option 2 |
|---|---|---|
Storing a task’s status |
A custom class, Pros Cons Our Choice |
Use a boolean to check if a task is complete. Pros Cons |
Sorting tasks by date |
Every time the Pros Cons Our Choice |
Keep an instance of the earliest and latest date. If dates fall out of range from the two dates, sorting does not happen. Pros Cons |
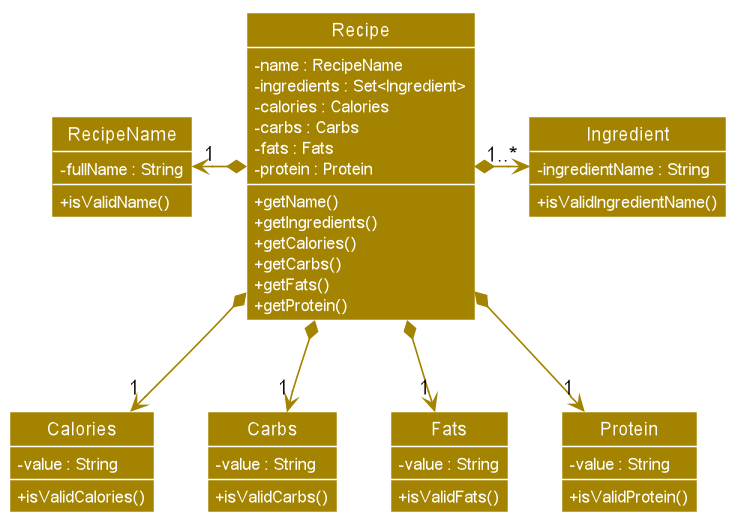
4.3. Recipe Book feature
The current implementation of Recipe Book consists of the following:
-
Each
Recipeconsists of a uniqueRecipeName -
Each
Recipecontains an Set ofIngredient -
Each
Recipeconsists of a uniqueCalories -
Each
Recipeconsists of a uniqueCarbohydrates -
Each
Recipeconsists of a uniqueFats -
Each
Recipeconsists of a uniqueProtein -
Each class has their respective getter methods
The class diagram below gives an overview of the Recipe class.
4.3.1. Implementation of recipe book commands
Recipe class supports multiple commands. It includes:
-
AddRecipeCommand- Adds aRecipeintoDukeCooks -
DeleteRecipeCommand- Deletes aRecipefromDukeCooks -
EditRecipeCommand- Edits the specifiedRecipe -
FindRecipeCommand- Finds allRecipewhoseRecipeNamecontains user-specified keywords
All the above recipe commands behave similarly. The commands will be parsed in DukeCooksParser and based on their
types (i.e Add, Delete, Edit etc), the corresponding variant parsers will be invoked (i.e AddRecipeCommandParser,
DeleteRecipeCommandParser etc). After which, the corresponding command will be executed (i.e AddRecipeCommand,
DeleteRecipeCommand etc).
The figure below describes the execution of an DeleteRecipeCommand.
The input provided is delete recipe 1.
After a successful execution, the recipe with the specified index will be deleted from the recipe book.
The DeleteRecipeCommand will also delete the recipe from all meal plans that by filtering through all saved meal plans, checking for the existence of the recipe it is about to delete, and replace that meal plan with a new one. This is done using MealPlan#removeRecipe.
4.3.2. Design Considerations
| Aspect | Option 1 (Chosen) | Option 2 |
|---|---|---|
Updating of recipe components in meal plans upon recipe modifications |
Dynamic updates upon recipe modification Pros Cons Our Choice |
Manual updates at any point in time Pros Cons |
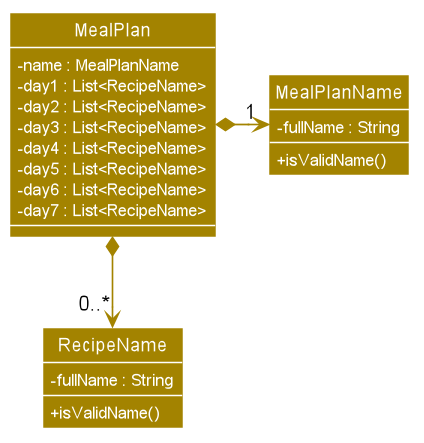
4.4. Meal Plan feature
The current implementation of Meal Plan consists of the following:
-
Each
Meal Planconsists of a uniqueMealPlanName -
Each
Meal Plancontains 7 Lists ofRecipeName -
Each class has their respective getter methods
The class diagram below gives an overview of the Meal Plan class.
4.4.1. Implementation of meal plan commands
MealPlan class supports multiple commands. It includes:
-
AddMealPlanCommand- Adds aMealPlanintoDukeCooks -
DeleteMealPlanCommand- Deletes aMealPlanfromDukeCooks -
EditMealPlanCommand- Edits the specifiedMealPlan -
FindMealPlanCommand- Finds allMealPlanwhoseMealPlanNamecontains user-specified keywords -
FindMealPlanWithCommandFinds allMealPlanwhose days contain user-specifiedRecipeName.
All the above meal plan commands behave similarly. The commands will be parsed in DukeCooksParser and based on their
types (i.e Add, Delete, Edit etc), the corresponding variant parsers will be invoked (i.e AddMealPlanCommandParser,
DeleteMealPlanCommandParser etc). After which, the corresponding command will be executed (i.e AddMealPlanCommand,
DeleteMealPlanCommand etc).
The figure below describes the execution of an DeleteMealPlanCommand.
The input provided is delete mealplan 1.
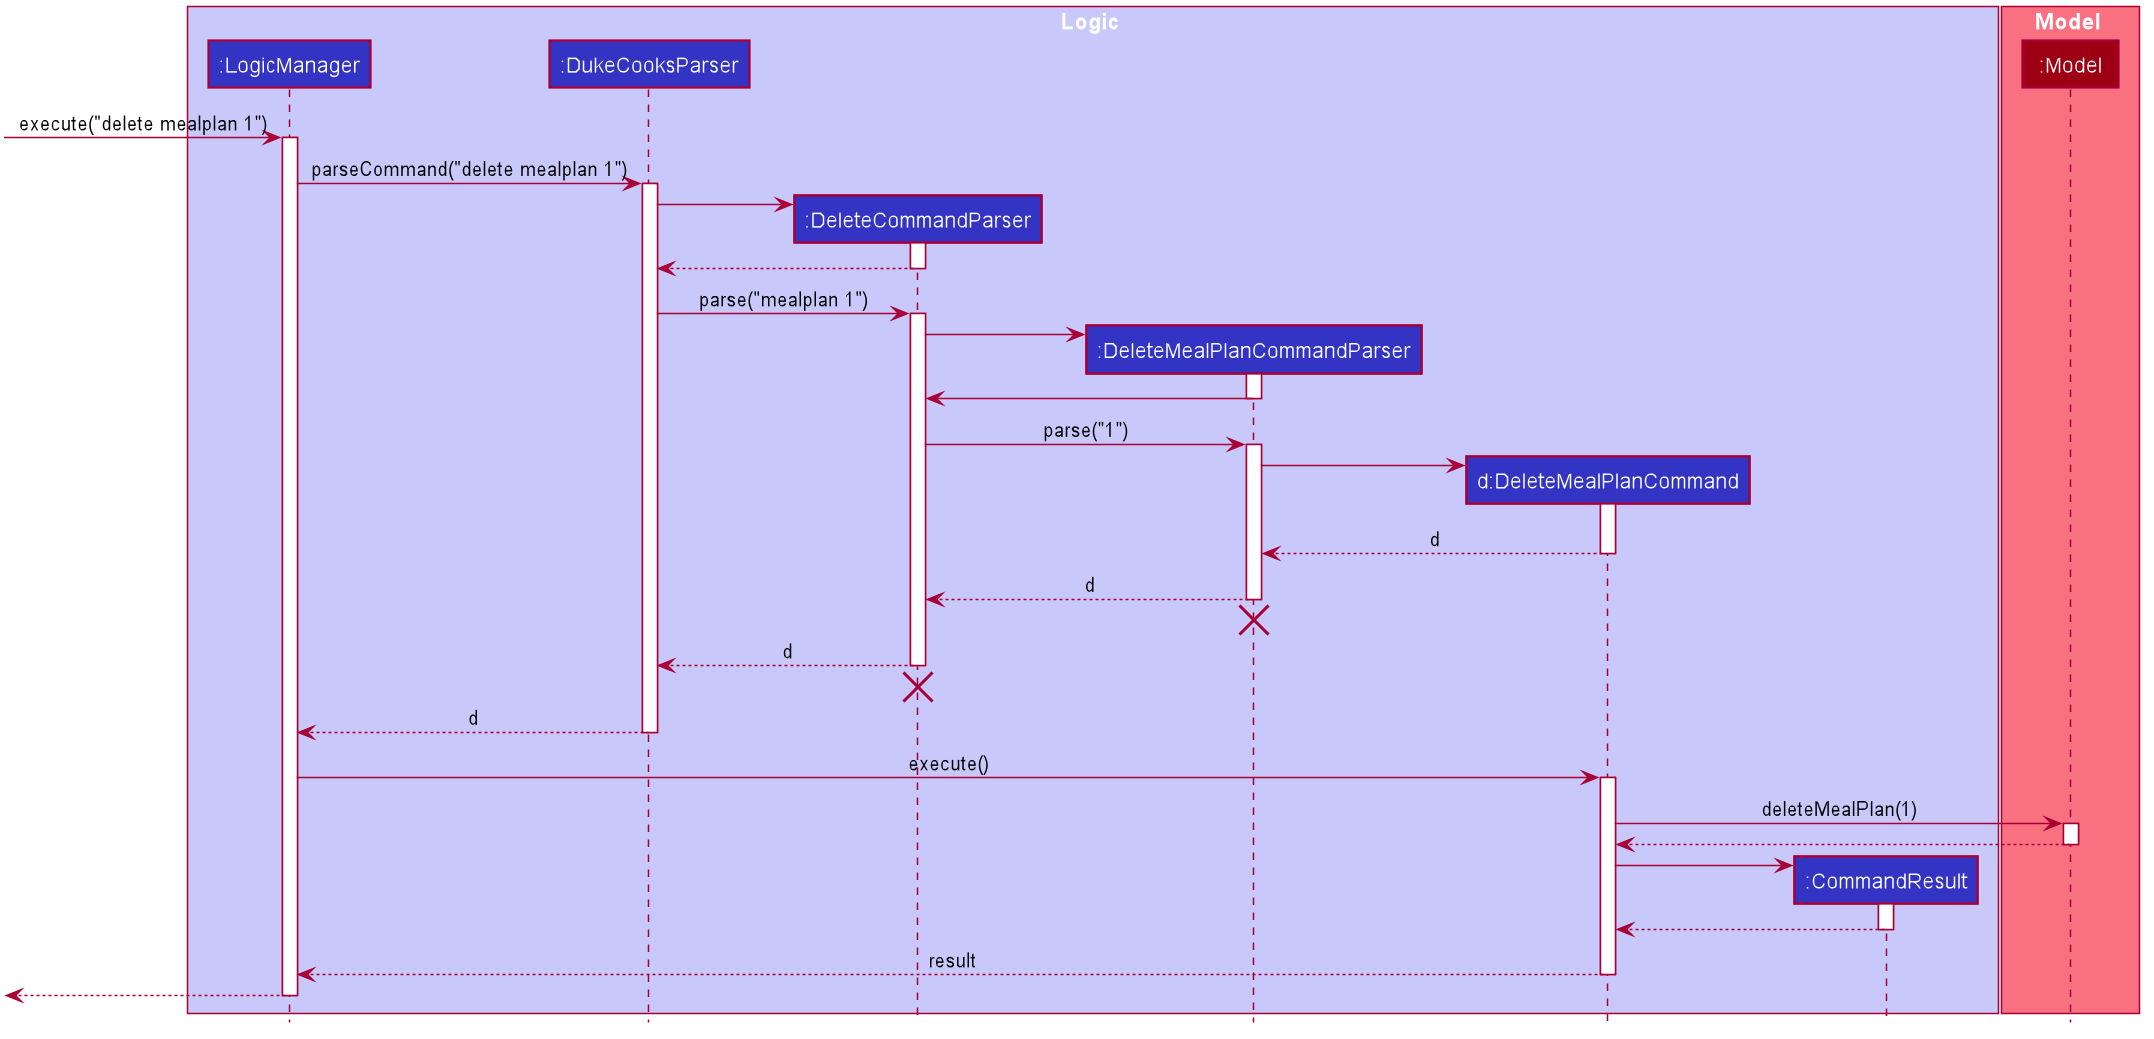
After a successful execution, the meal plan with the specified index will be deleted from the meal plan book.
4.4.2. Design Considerations
| Aspect | Option 1 (Chosen) | Option 2 |
|---|---|---|
Amount of recipe information to be saved in a meal plan |
Saving only the recipe name Pros Cons Our Choice |
Saving the entire recipe Pros Cons |
4.5. Workout Planner feature
The workout feature allows users to create their own custom workouts with add Workout command and adding their own
custom exercises to it with push exercise. With these custom workouts, they can then choose to run them through
run workout and monitor their progress and workout history with view workout.
4.5.1. Implementation
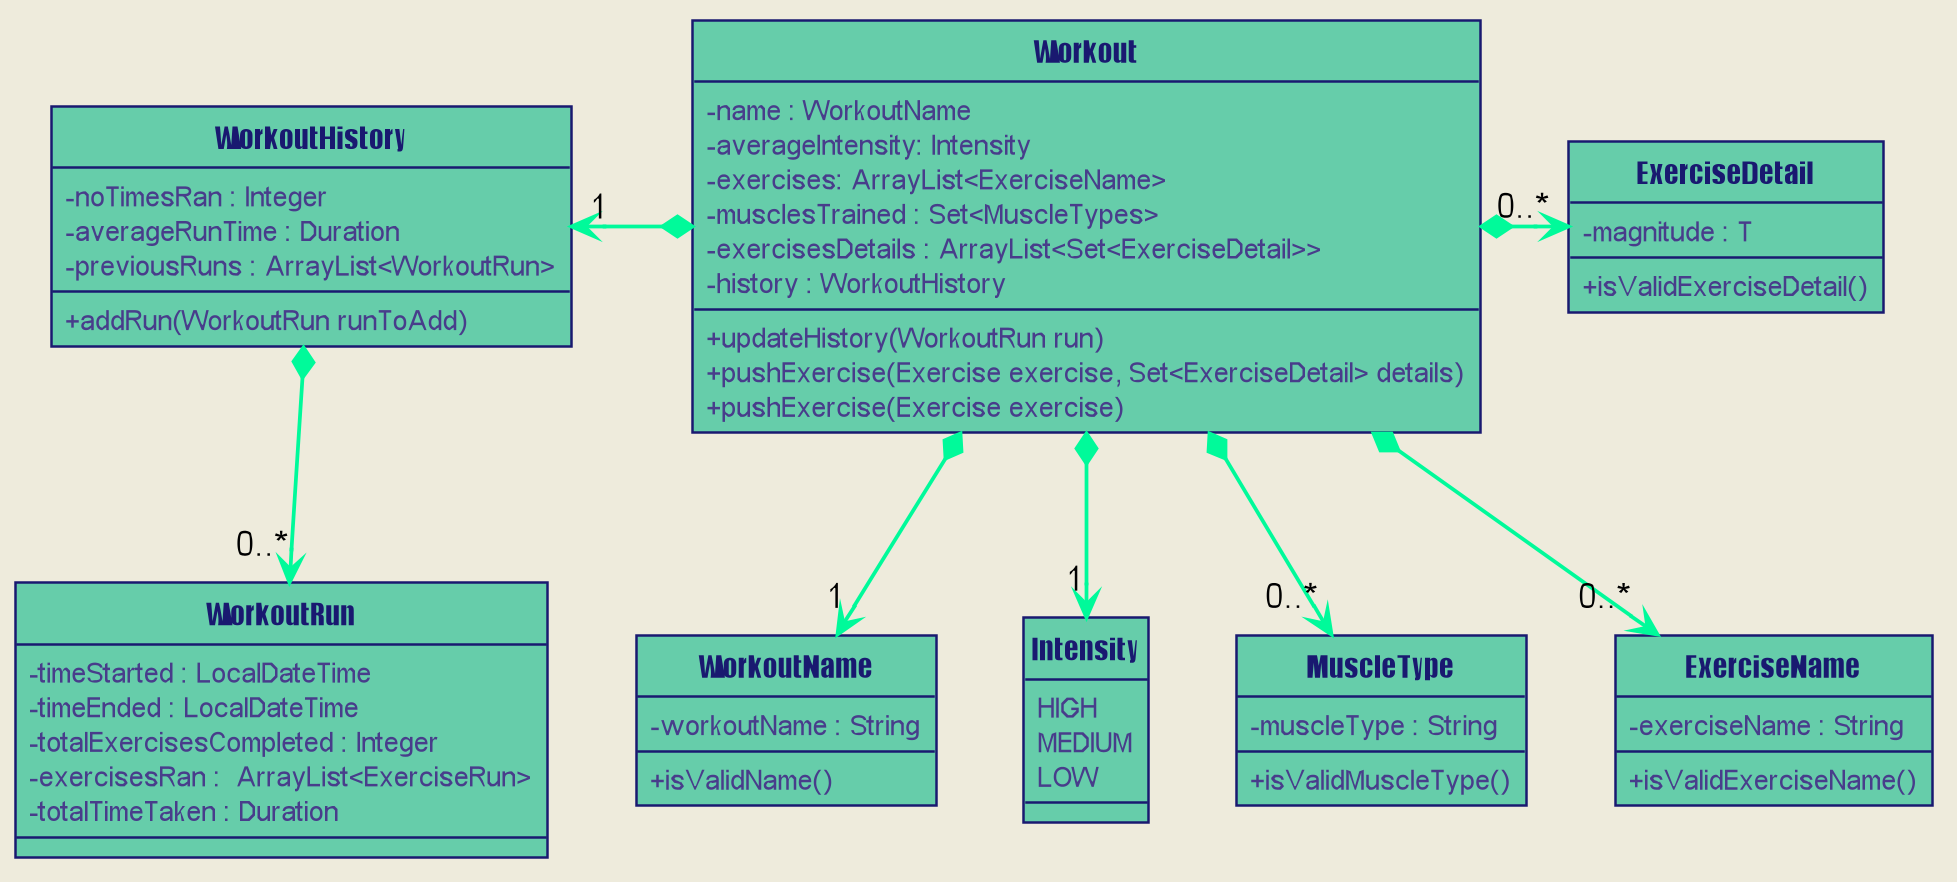
Workout Management
Every workout comprises of the following information:
-
WorkoutNamerepresenting the name of the workout -
Average Intensityrepresenting the average demands of the exercises in the workout -
A set of
MuscleTypewhich represents all the muscles trained by the workout -
An ArrayList of
ExerciseNameof exercises that would be carried out in the workout -
WorkoutHistorycontaining information on all the previous runs of the workout as well as some statistics
The Workout Class also contains the function updateHistory(WorkoutRun run) which adds the WorkoutRun into the
WorkoutHistory and updates all the relevant fields accordingly, returning a new Workout instance with updated WorkoutHistory.
The class also utilises pushExercise(Exercise exercise, Set<ExerciseDetail> details) function to add new Exercise and
return a new Workout with update fields. There is also an option to push an exercise without the details with the overloaded
method which instead opts to use the pre-built Set of ExerciseDetails in the Exercise itself.
The Workout Class is represented by the class diagram below.
The Workout Class is managed by the following commands:
-
AddWorkoutCommand- Adds a new emptyWorkoutintoWorkoutPlanner -
DeleteWorkoutCommand- Deletes aWorkoutspecified by anIndexfromWorkoutPlanner -
PushExerciseCommand- Pushes anExercisespecified by anIndexinto an existingWorkout
Exercise Management
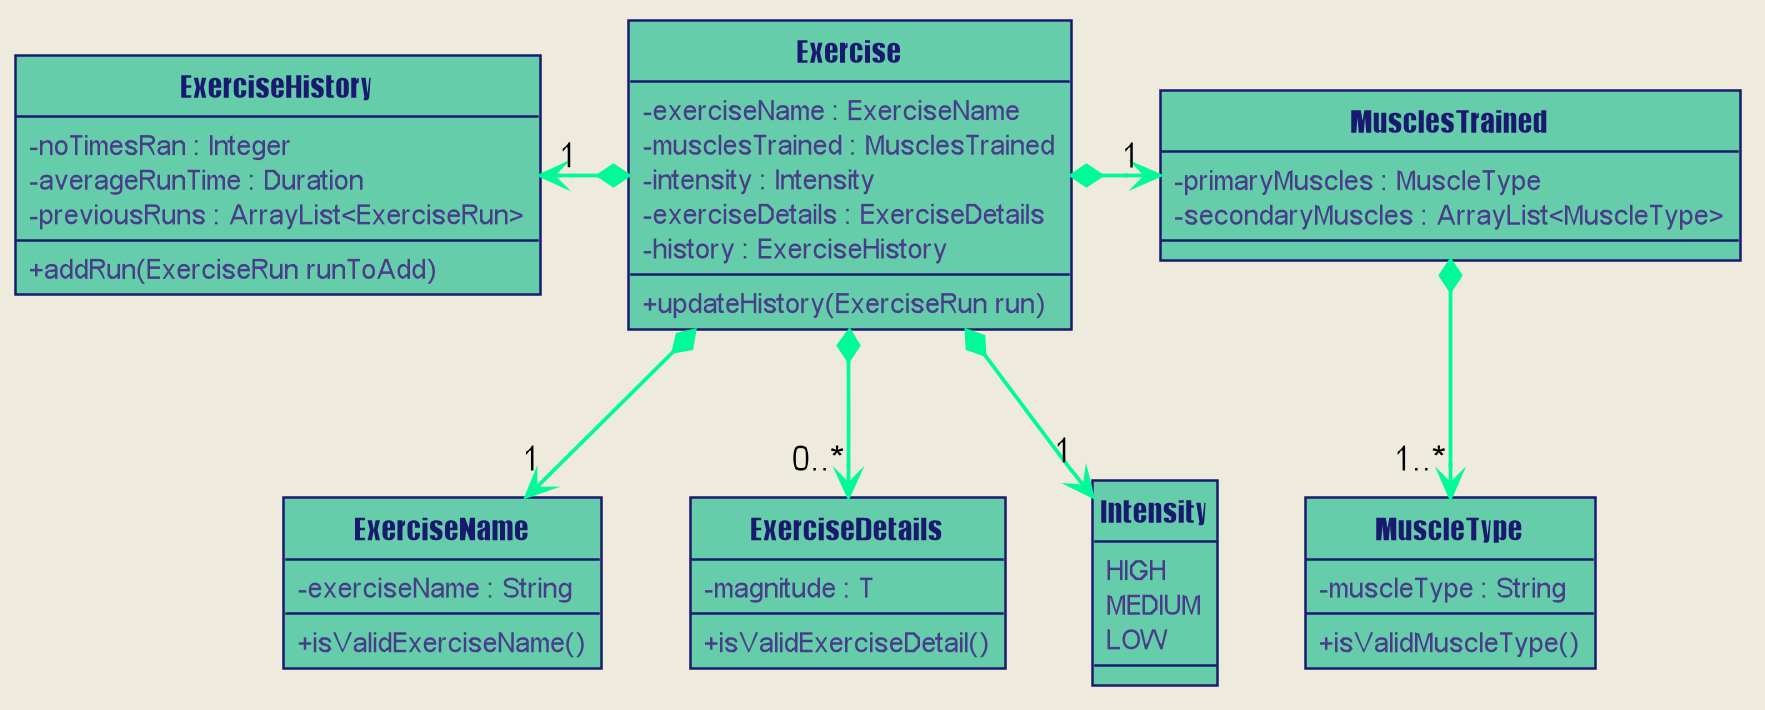
In order to run a Workout, users will have to add Exercises into the Workout as an empty workout cannot be ran.
Users can use existing exercises or create their own custom exercises. Every exercise contains the following information:
-
ExerciseNamerepresenting the name of the exercise -
MusclesTrainedcomprising of the primaryMuscleTypeas well as an ArrayList of secondaryMuscleTypetrained -
Intensityor how demanding the exercise is -
A set of
ExerciseDetailswhich are optional additional information of the exercise such asExerciseWeight,Distance,SetsandRepetitions -
ExerciseHistorycontaining information on all the previousExerciseRunof the exercise
Like Workout, Exercise also has the method updateHistory which returns an updated Exercise with a new
ExerciseRun accounted for.
The Exercise class is represented by the following class diagram below.
The Exercise class is managed by the following commands :
-
AddExerciseCommand- Adds a newExerciseintoWorkoutPlanner -
ClearExerciseCommand- Clears all theExerciseobjects inWorkoutPlanner -
DeleteExerciseCommand- Deletes anExercisespecified by anIndexfromWorkoutPlanner -
EditExerciseCommand- Edits the specifiedExercisewith newly specified information -
FindExerciseByIntensityCommand- Lists allExerciseobjects with theIntensityspecified -
FindExerciseByMuscleCommand- Lists allExerciseobjects which trains theMuscleTypespecified -
'FindExerciseCommand' - Lists all
Exerciseobjects withExerciseNamethat contains the string specified -
'ListExercise' - Lists all 'Exercise' objects in
WorkoutPlanner
All the exercise and workout commands above are parsed in DukeCooksParser, invoking the respective Command Parsers
(Add, Delete, Edit etc.). The Exercise/Workout variant of the parser will then be instantiated
(i.e AddExerciseCommandParser,DeleteWorkoutCommandParser etc) to create the actual command objects
(i.e AddExerciseCommand, DeleteWorkoutCommand etc). These Command Objects will then execute the necessary steps
to fulfill their functionality.
Running of Workouts
The core functionality of the WorkoutPlanner is to run a Workout and have it automatically tracking your progress
by making records in its history. This is done through the Run Workout Command. The following sequence diagrams show
what happens when the command is invoked.
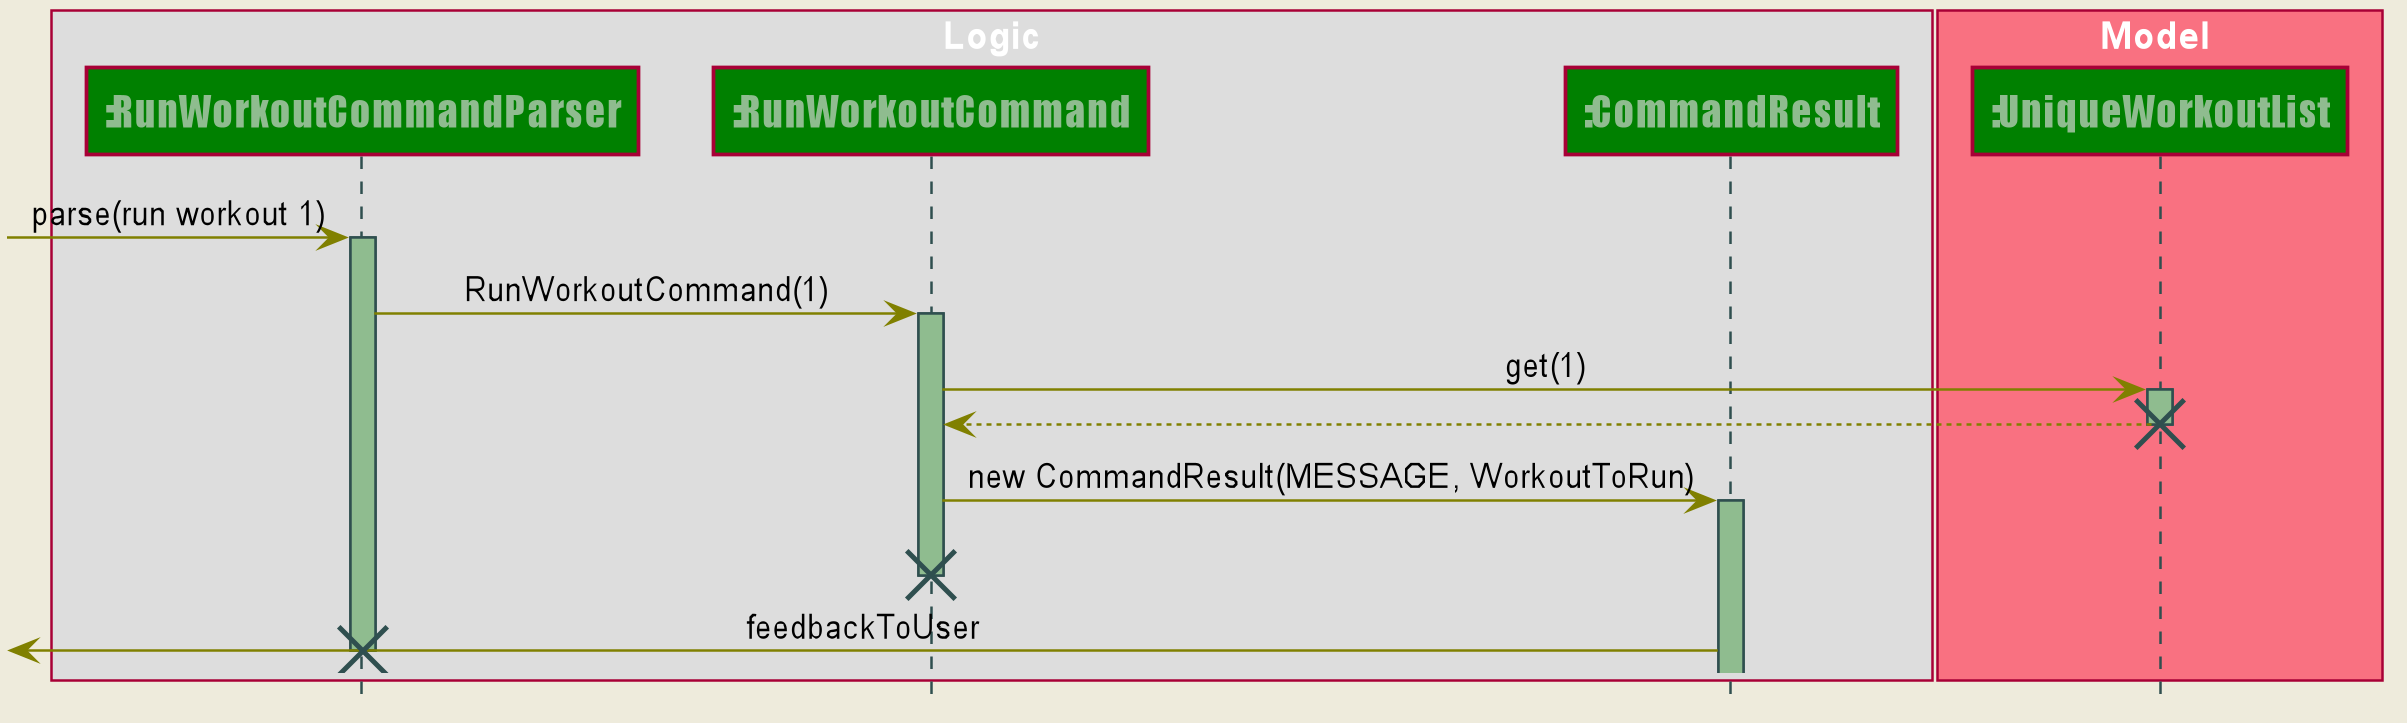
As seen in the diagram above, when the command is invoked, the RunWorkoutParser is initialised to parse the argument String
to initialise RunWorkoutCommand. The Command object will then run its execute method, which calls upon get method of
UniqueWorkoutList to obtain the target Workout. The target workout and message will then be passed back to the Ui through
the CommandResult object. The Ui will then boot a new RunWorkoutWindow with the targeted workout.
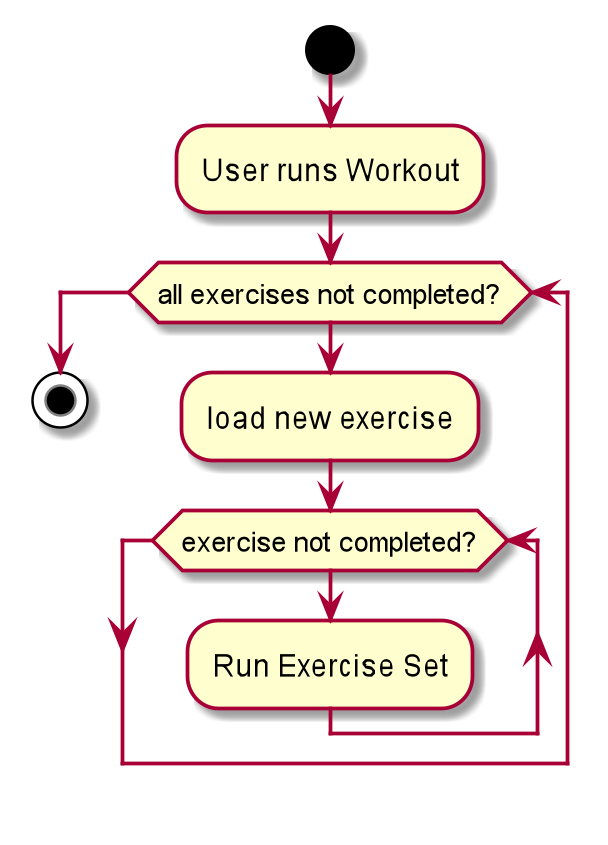
The user will then run each set of each exercise until the workout is complete. The full loop is demonstrated in the activity diagram in Figure 17.
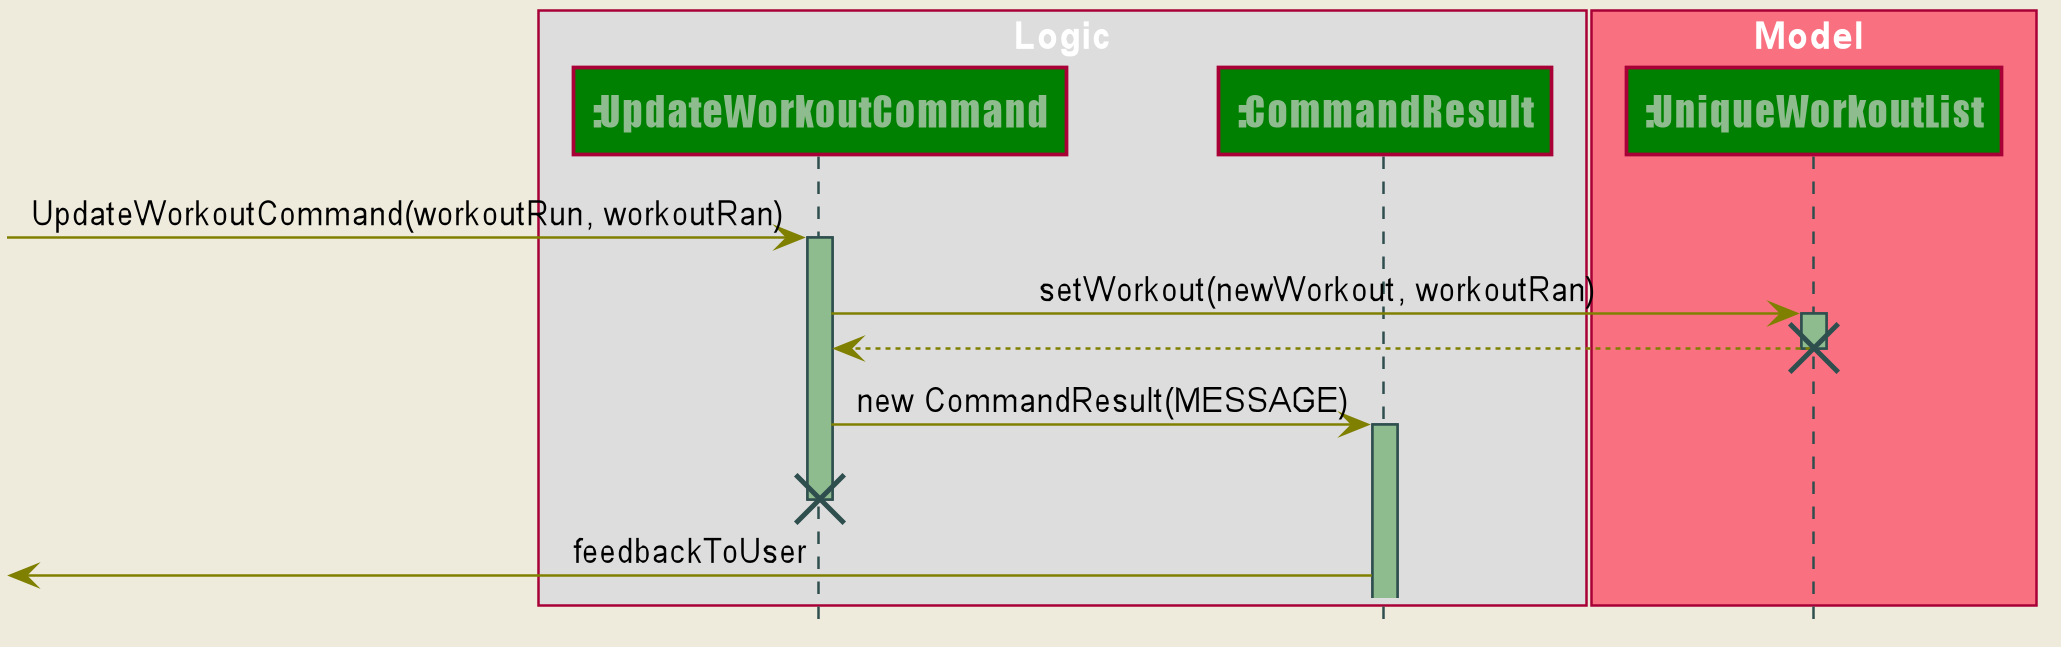
Upon completion of the workout, the Ui will immediately generate a new UpdateWorkoutCommand containing the Workout
that has been ran and a newly instantiated WorkoutRun with the details of the run. UpdateWorkoutCommand will then
be executed and the following will occur:
-
New Workout will be generated.
Using Workout’supdateHistorymethod, a new updatedWorkoutwill be created. -
The outdated Workout will be replaced by the new Workout.
UsingUniqueWorkoutList'ssetWorkoutmethod, the old workout will be removed and the updated one will be placed in its stead -
CommandResult is generated and passed back to Ui.
A new CommandResult will be returned containing a congratulatory message to the Ui signalling the successful completion of the workout.
Design Considerations
| Aspect | Option 1 (Chosen) | Option 2 |
|---|---|---|
Storing an Exercise/Workout’s intensity |
Intensity was stored as an Enumeration instead of a class Pros Cons Our Choice |
Setting Intensity as a Class Pros Cons |
Storing MuscleTypes |
Have MuscleType be a class on its own Pros Cons Our Choice |
Store MuscleType as an enumeration Pros Cons |
Storage of Exercises in Workout |
Workouts only store a list of ExerciseName and not the full exercise Pros Cons Our Choice In the end we decided to choose this option as we foresee that the edit command will be utilised more often than calling an exercise from a workout. Furthermore, to improve timing, we kept a sorted storage for exercise to allow for the quicker binary search. |
Workouts store whole Exercises Pros Cons |
4.6. Health Records feature
The Health Records feature allows user to track their health progress using the commands
add health, as well as making changes to their records with edit health, delete health and clear health.
Additionally, users can create and personalize their own profile with the commands add profile,
edit profile and delete profile.
In a nut shell, the Health Records feature supports the following operations:
-
Storing of the health data recorded by the user
-
Present the data with graph representation that shows the health progress of the user
-
Personalizing user profile
4.6.1. Implementation
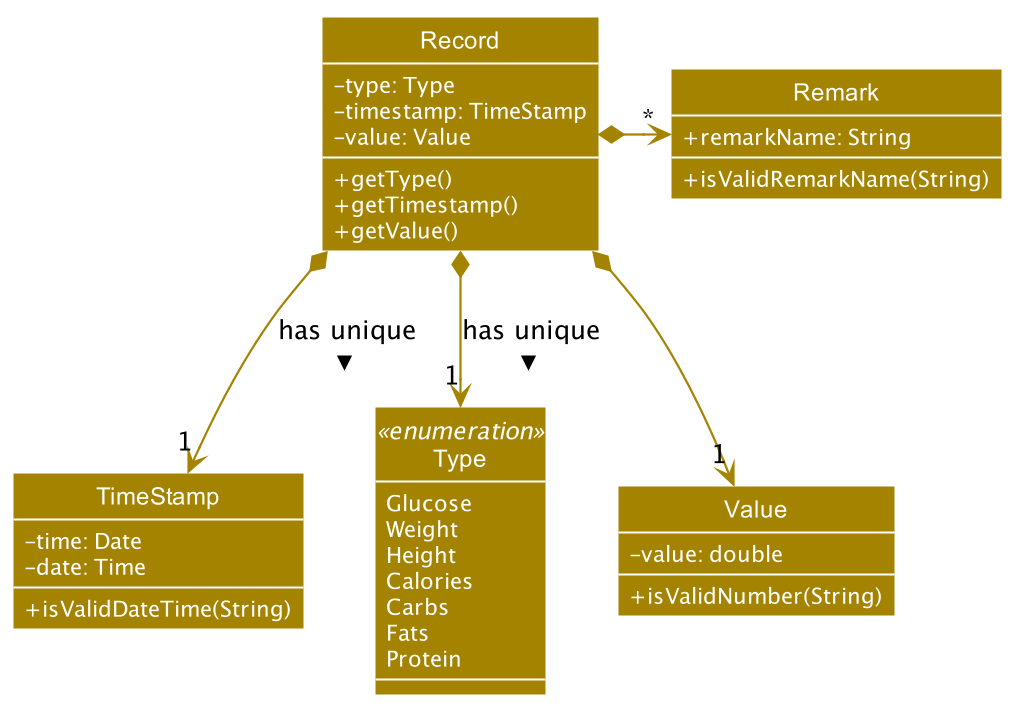
A Record consist of four key components: Type, Timestamp, Value, Remark.
Refer to the diagram below to understand the structure of Record.
4.6.2. Implementation of Health Records commands
Record class supports multiple commands. It includes:
-
AddRecordCommand- Adds aRecordinto DukeCooks -
DeleteRecordCommand- Deletes aRecordfrom DukeCooks -
EditRecordCommand- Edits the specifiedRecordwith a new changes made -
ListHealthCommand- Lists all available records to user -
ListHealthByTypeCommand- Lists all available records of the corresponding record type to user -
ClearHealthCommand- Clears all available records
Person class supports multiple commands. It includes:
-
AddProfileCommand- Adds a newPersoninto DukeCooks -
DeleteProfileCommand- Deletes thePersoninto DukeCooks -
EditProfileCommand- Edits various fields of the specifiedPerson
|
User Profile consist of one |
4.6.3. Execution of AddRecordCommand
The sequence diagram below illustrates the execution of an AddRecordCommand.
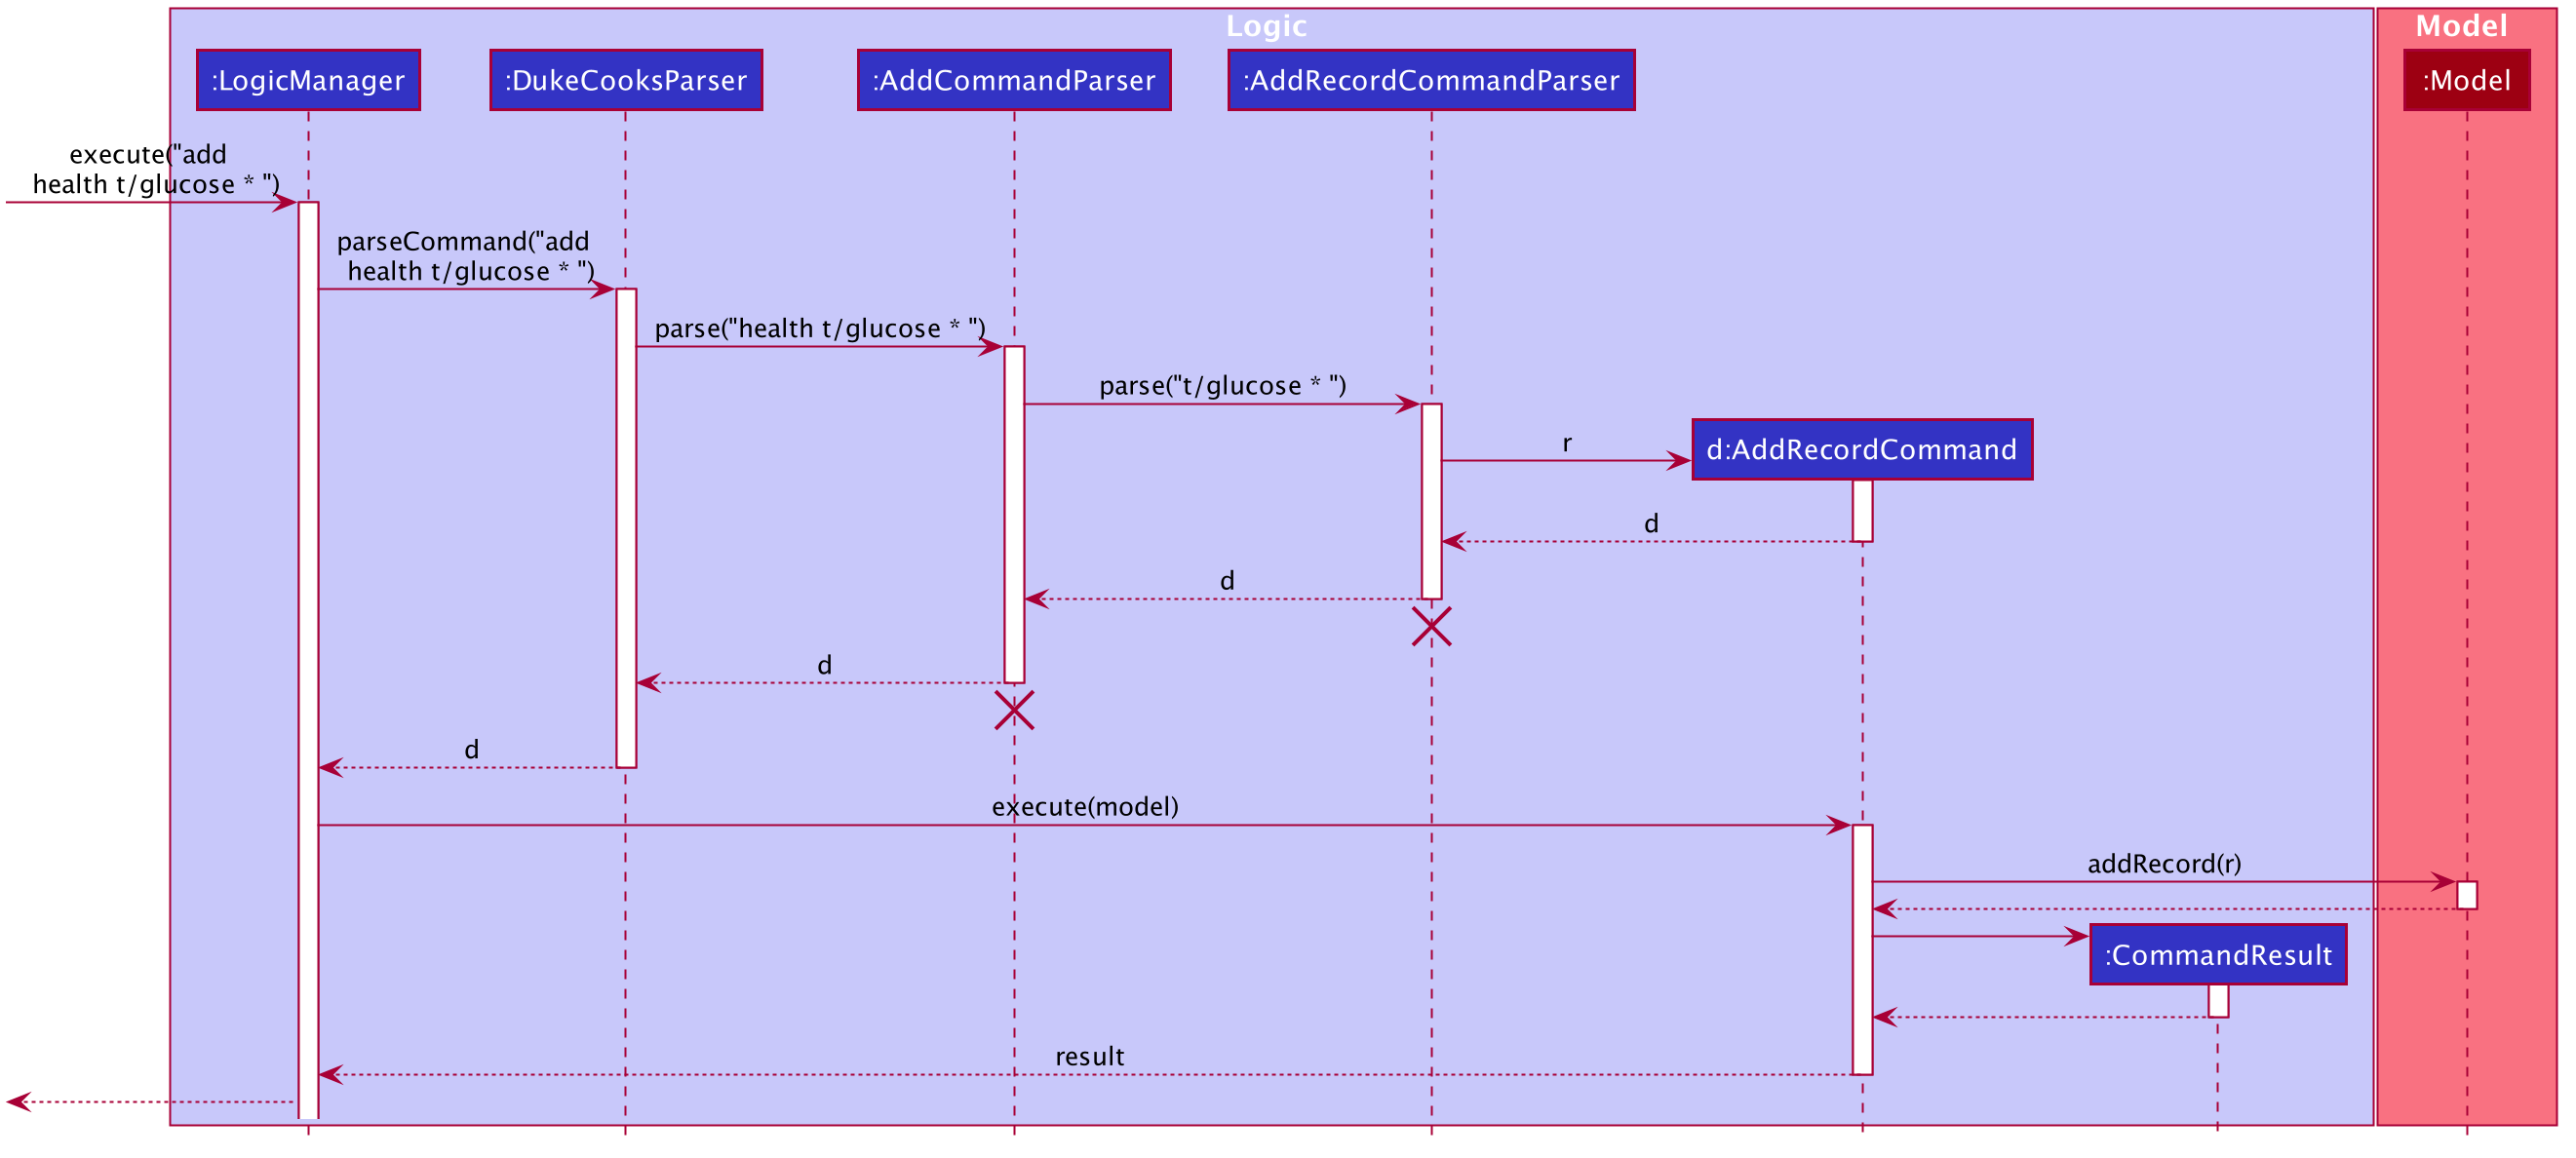
The command will first be parsed in 'DukeCooksParser' and be handled to its corresponding parsers (i.e. AddRecordCommandParser) based on its variant word
(i.e. Add).
After the parsing has been executed successfully, the string argument will be converted to Type, Value, Timestamp,
Remark attributes. These attributes will then be passed into the Model component for its underlying validity checks.
Once all checks have passed successfully, a new Record will be created according to those attributes
and added to health records with the command Model#addRecord.
|
The illustration of the above execution only applies to all record types except for Weight and Height. Refer to the next section for more details. |
4.6.4. Syncing record data with profile
To illustrate why the simple model of AddRecordCommand will not suffice for Weight and Height record types,
below depicts the class diagram of the Person class
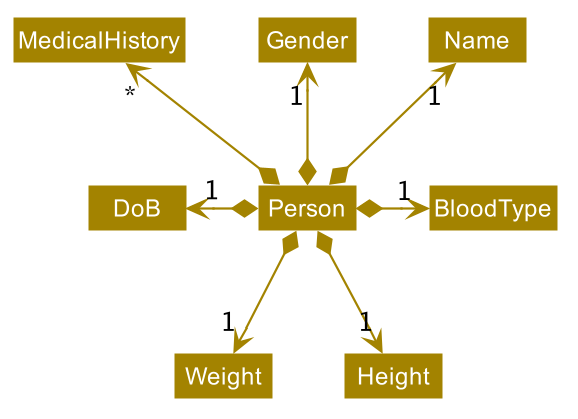
It can be observed that Person share similar attributes to Record, both Weight and Height.
However, the implementation of the two types are distinctly different among Record and Person. Record have
structured Weight and Height to be attributes of its Type enum class while Person has defined
them separately to be classes of their own.
The Sequence diagram below illustrates the execution of AddRecordCommand with additional component introduced to
help sync data between the Record and Person.
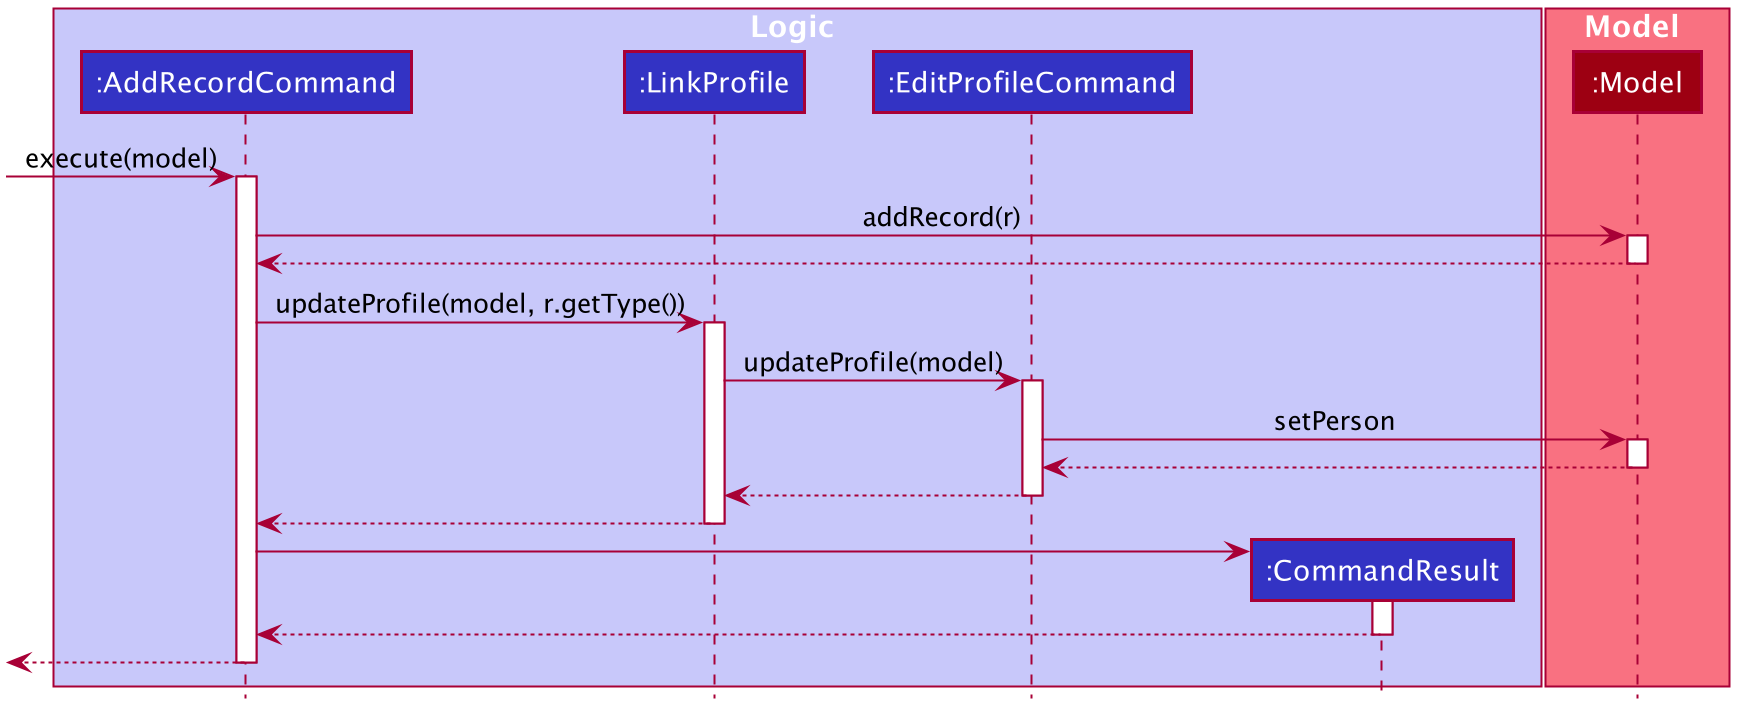
Once Model#addRecord has been executed, AddRecordCommand will check the type of
the newly added record. If it is a Weight or Height record, LinkProfile#updateProfile
will be called. The LinkProfile helps AddRecordCommand to invoke EditProfileCommand by
calling for changes to be made for profile.
A simplified activity diagram of the problem can be shown below.
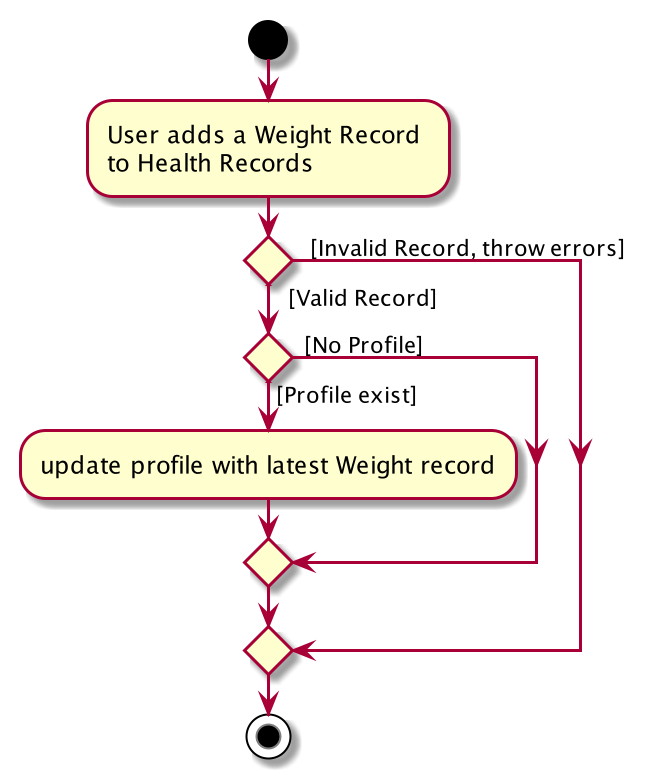
Once profile have been successfully updated, person’s weight/ height is expected to be in sync with health records.
4.6.5. Design Considerations
| Aspect | Option 1 (Chosen) | Option 2 |
|---|---|---|
Data Structure used to store Record Type |
Pros Cons This choice was chosen as it is easier to maintain for our model. Additionally, the extension of having user defined health types would mean more validity checks and maintenance needed. |
A Pros Cons |
4.7. Diary feature
4.7.1. Implementation
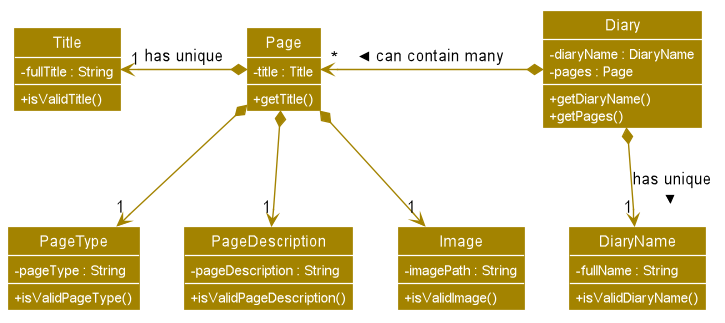
The current implementation of Diary consists of the following:
-
Each
Diaryconsists of a uniqueDiaryName -
Each
Diarycontains an array list ofPage -
Each
Pageis identified by a uniqueTitle,PageType,Page DescriptionandPage Image -
Each class has their respective getter methods
The class diagram below gives an overview of the Diary class.
4.7.2. Implementation of diary commands
Diary class supports multiple commands. It includes:
-
AddDiaryCommand- Adds aDiaryinto DukeCooks -
DeleteDiaryCommand- Deletes aDiaryfrom DukeCooks -
EditDiaryCommand- Edits the specifiedDiarywith a newDiaryName -
ViewDiaryCommand- Views the specifiedDiaryusing the provided index -
FindDiaryCommand- Finds the specifiedDiaryusing the provided keyword -
ListDiaryCommand- Lists all available diaries to user -
AddPageCommand- Adds a newPageto the specifiedDiary -
DeletePageCommand- Deletes thePagein the specifiedDiary -
EditPageCommand- Edits various fields of the specifiedPage
All the above commands behave similarly. The commands will be parsed in DukeCooksParser first and based on their
types (i.e Add, Delete, Edit etc), the corresponding variant parsers will be invoked (i.e AddDiaryCommandParser,
DeleteDiaryCommandParser etc). After which, the corresponding command will be executed (i.e AddDiaryCommand,
DeleteDiaryCommand etc).
The figure below describes the execution of an DeleteDiaryCommand.
After a successful execution, the specified diary will be removed.
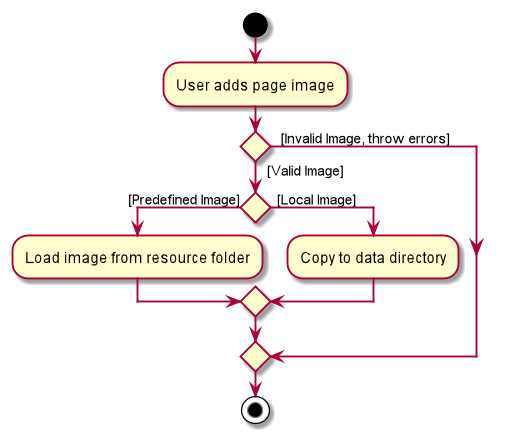
4.7.3. Implementation of Images
All images used in DukeCooks are copied into an internal data folder and all subsequent loading of images is done from within this internal folder. The following activity diagram explains how an image is created in DukeCooks:
4.7.4. Design Considerations
| Aspect | Option 1 (Chosen) | Option 2 |
|---|---|---|
Data structures used to store |
Pros Cons Our Choice |
Pros Cons |
Loading of images |
Defensively copies images into our internal data folder and all subsequent loading of images is done from this folder. Pros Cons Our Choice |
Load images directly from user’s directory Pros Cons |
4.8. Logging
We are using java.util.logging package for logging. The LogsCenter class is used to manage the logging levels and logging destinations.
-
The logging level can be controlled using the
logLevelsetting in the configuration file (See Section 4.9, “Configuration”) -
The
Loggerfor a class can be obtained usingLogsCenter.getLogger(Class)which will log messages according to the specified logging level -
Currently log messages are output through:
Consoleand to a.logfile.
Logging Levels
-
SEVERE: Critical problem detected which may possibly cause the termination of the application -
WARNING: Can continue, but with caution -
INFO: Information showing the noteworthy actions by the App -
FINE: Details that is not usually noteworthy but may be useful in debugging e.g. print the actual list instead of just its size
4.9. Configuration
Certain properties of the application can be controlled (e.g user prefs file location, logging level) through the configuration file (default: config.json).
5. Documentation
We use asciidoc for writing documentation.
| We chose asciidoc over Markdown because asciidoc provides greater flexibility in formatting. |
5.1. Editing Documentation
You may refer to UsingGradle.adoc and learn how to render .adoc files locally to preview the end result of your edits.
Alternatively, you can download the AsciiDoc plugin for IntelliJ, which allows you to preview the changes you have made to your .adoc files in real-time.
5.2. Editing Diagrams
You may refer to UsingPlantUml.adoc and learn how to create and update UML diagrams in the Developer Guide.
5.3. Publishing Documentation
You may refer to UsingTravis.adoc and learn how to deploy GitHub Pages using Travis.
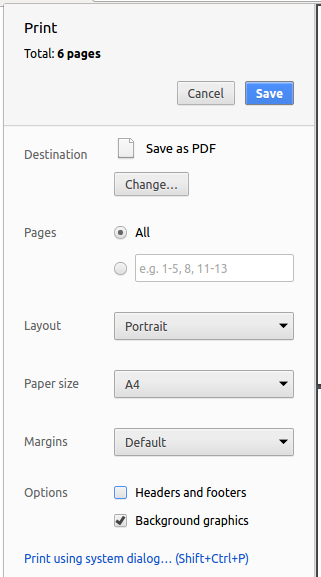
5.4. Converting Documentation to PDF format
We use Google Chrome for converting documentation to PDF format, as Chrome’s PDF engine preserves hyperlinks used in webpages.
Here are the steps to convert the project documentation files to PDF format.
-
Follow the instructions in UsingGradle.adoc to convert the AsciiDoc files in the
docs/directory to HTML format. -
Go to your generated HTML files in the
build/docsfolder, right click on them and selectOpen with→Google Chrome. -
Within Chrome, click on the
Printoption in Chrome’s menu. -
Set the destination to
Save as PDF, then clickSaveto save a copy of the file in PDF format. For best results, use the settings indicated in the screenshot below.
5.5. Site-wide Documentation Settings
The build.gradle file specifies some project-specific asciidoc attributes which affects how all documentation files within this project are rendered.
Attributes left unset in the build.gradle file will use their default value, if any.
|
| Attribute name | Description | Default value |
|---|---|---|
|
The name of the website. If set, the name will be displayed near the top of the page. |
not set |
|
URL to the site’s repository on GitHub. Setting this will add a "View on GitHub" link in the navigation bar. |
not set |
5.6. Per-file Documentation Settings
Each .adoc file may also specify some file-specific asciidoc attributes which affects how the file is rendered.
Asciidoctor’s built-in attributes may be specified and used as well.
Attributes left unset in .adoc files will use their default value, if any.
|
| Attribute name | Description | Default value |
|---|---|---|
|
Site section that the document belongs to.
This will cause the associated item in the navigation bar to be highlighted.
One of: * Official SE-EDU projects only |
not set |
|
Set this attribute to remove the site navigation bar. |
not set |
5.7. Site Template
The files in docs/stylesheets are the CSS stylesheets of the site.
You can modify them to change some properties of the site’s design.
The files in docs/templates controls the rendering of .adoc files into HTML5.
These template files are written in a mixture of Ruby and Slim.
|
Modifying the template files in |
6. Testing
6.1. Running Tests
There are two ways to run tests.
Method 1: Using IntelliJ JUnit test runner
-
To run all tests, right-click on the
src/test/javafolder and chooseRun 'All Tests' -
To run a subset of tests, you can right-click on a test package, test class, or a test and choose
Run 'ABC'
Method 2: Using Gradle
-
Open a console and run the command
gradlew clean test(Mac/Linux:./gradlew clean test)
| You may refer to UsingGradle.adoc for more information on how to run tests using Gradle. |
6.2. Types of tests
We have three types of tests:
-
Unit tests targeting the lowest level methods/classes.
e.g.dukecooks.StringUtilTest -
Integration tests that are checking the integration of multiple code units (those code units are assumed to be working).
e.g.dukecooks.storage.StorageManagerTest -
Hybrids of unit and integration tests. These test are checking multiple code units as well as how the are connected together.
e.g.dukecooks.LogicManagerTest
7. Dev Ops
7.1. Build Automation
You may refer to UsingGradle.adoc and learn how to use Gradle for build automation.
7.2. Continuous Integration
We use Travis CI and AppVeyor to perform Continuous Integration on our projects. Refer to UsingTravis.adoc and UsingAppVeyor.adoc for more details.
7.3. Coverage Reporting
We use Coveralls to track the code coverage of our projects. Refer to UsingCoveralls.adoc for more details.
7.4. Documentation Previews
When a pull request make changes to asciidoc files, you can use Netlify to see a preview of how the HTML version of those asciidoc files will look like when the pull request is merged. Refer to UsingNetlify.adoc for more details.
7.5. Making a Release
Here are the steps to create a new release.
-
Update the version number in
MainApp.java. -
Generate a JAR file using Gradle.
-
Tag the repo with the version number. e.g.
v0.1 -
Create a new release using GitHub and upload the JAR file you created.
7.6. Managing Dependencies
A project often depends on third-party libraries. For example, DukeCooks depends on the Jackson library for JSON parsing. Managing these dependencies can be automated using Gradle. For example, Gradle can download the dependencies automatically, which is better than these alternatives:
-
Include third-party libraries in the repository (This bloats the repository size)
-
Require developers to download third-party libraries manually (Requires extra work from developers)
Appendix A: Product Scope
Target user profile:
-
health conscious individuals
-
prefers to have a complete health monitoring all in one app
-
prefer desktop apps over other types
-
can type fast
-
prefers typing over mouse input
-
is reasonably comfortable using CLI apps
Value proposition:
DukeCooks monitors all aspects of the user’s lifestyle in one single application. This provides the user with the added
benefit of having to only manage a single application, instead of managing different applications. This is particularly
useful for busy individuals who do not have time to manage different applications.
Appendix B: User Stories
Priorities: High (must have) - * * *, Medium (nice to have) - * *, Low (unlikely to have) - *
| Priority | As a … | I want to … | So that I can… |
|---|---|---|---|
|
Home Cook |
store all my recipes |
easily list out all the ingredients I have to buy for a weekly meal plan |
|
Unorganised student |
sort my task list by date |
see which task to prioritise |
|
Unmotivated student |
receive motivational messages upon completing tasks |
gain motivation |
|
Health conscious person |
track my health progress |
manage my diet |
|
Fitness enthusiast |
track my exercises |
keep a history of my fitness progress |
|
Food Blogger |
consolidate my food and exercise plan |
share them with other interested individuals |
|
Foodie |
find new places to eat |
try out new places and share the experience with others |
|
Fun Seeker |
keep track of my health in a game like way |
have fun and be healthy at the same time |
Appendix C: Use Cases
The following is a Use Case diagram (Figure 29) for the Dashboard.
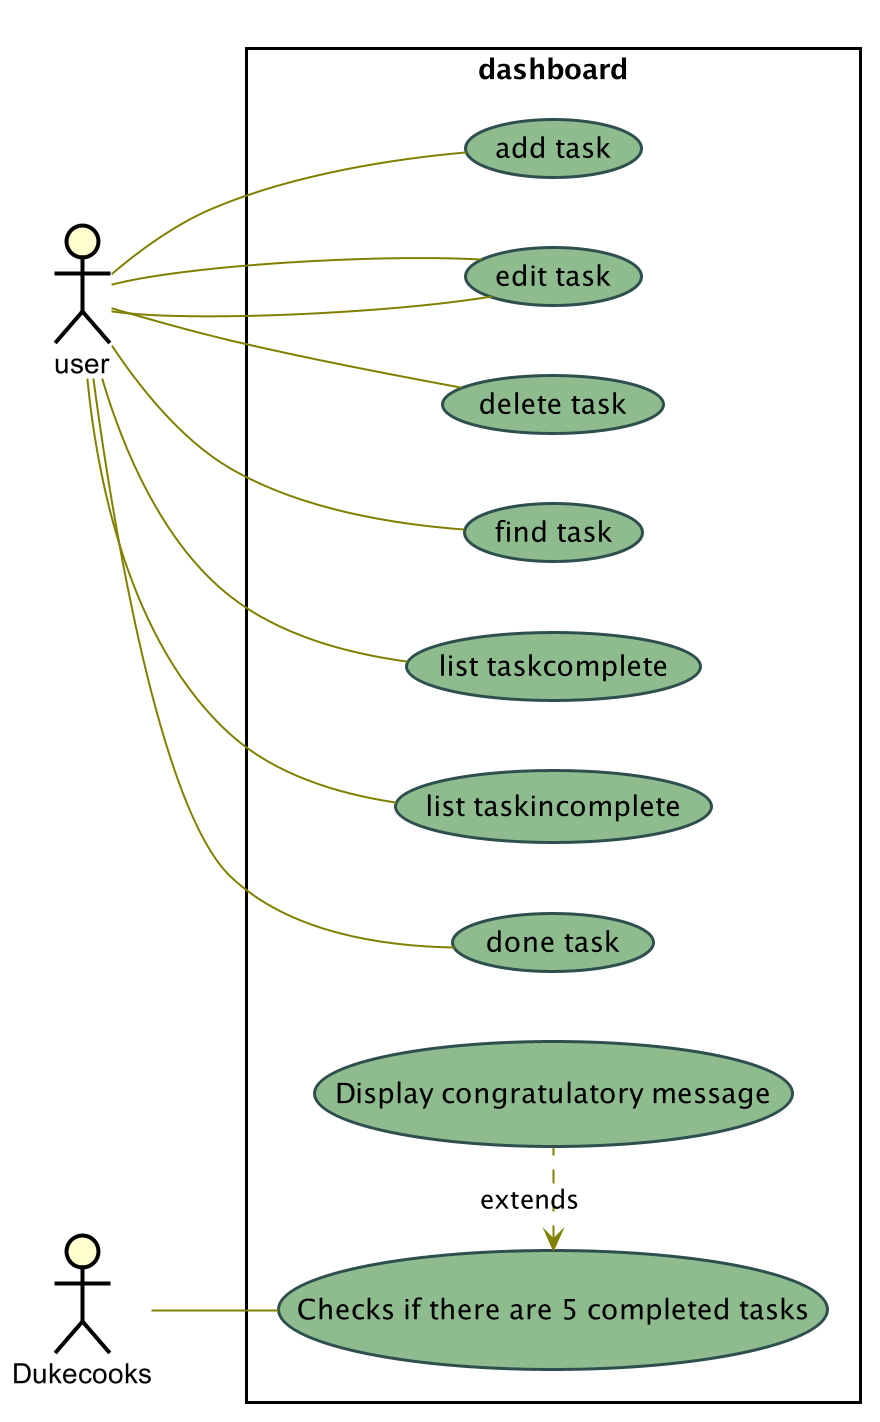
(For all use cases below, the System is DukeCooks and the Actor is the user, unless specified otherwise)
Use case: UC01 - Mark as complete
A use case for marking a task as complete.
Software System: DukeCooks
UseCase: UC01 - Mark as complete
Actors: User
MSS:
1. User completes a task and wants to marked it as complete.
2. User selects a task according to it's index number to mark as
complete.
3. User enters the command `done task` followed by the index
number in the command box.
4. DukeCooks finds the inputted index number and corresponding
task and marks it as complete.
5. DukeCooks updates the Dashboard to reflect the changes made.
6. DukeCooks returns a message: Task is marked as complete, for
the user.

Extensions:
1a. User is not currently at the Dashboard.
    1a1. User enters `goto dashboard`.
    1a2. DukeCooks displays the Dashboard to the user.
Use case resumes from step 2.

3a. DukeCooks detects an error in the entered data.
    3a1. DukeCooks displays an error message.
    3a2. User enters new data.

Steps 3a1. and 3a2. are repeated until the data entered are correct.
Use case resumes from step 4.
Use case: UC02 - Adding recipes
MSS
-
User requests to list recipes
-
DukeCooks shows a list of recipes
-
User requests to add a recipe to the list
-
DukeCooks adds the recipe to the list
Use case ends.
Extensions
-
2a. The list is empty.
Use case ends.
-
3a. The given index is invalid.
-
3a1. DukeCooks shows an error message.
Use case resumes at step 2.
-
Use case: UC03 - Adding Glucose Record
MSS
-
User requests to add glucose record
-
A new glucose record is added to Health Records
-
DukeCooks filters the records to only glucose related records
-
DukeCooks directs user to health record’s record type page.
Use case ends.
Extensions
-
1a. DukeCooks detects error in parsing user input
-
1a1. DukeCooks displays error message
-
1a2. User enters new input
Steps 1a1. and 1a2. are repeated until the data entered are correct. Use case resumes from step 2.
-
Use case: UC04 - Creating Workouts
MSS
-
User requests to list [exercise]
-
DukeCooks shows a list of [exercise]
-
User requests to add an exercise into their [workout]
-
DukeCooks adds the exercise into the [workout]
Use case ends.
Extensions
-
2a. The exercise list is empty
-
2a1. DukeCooks updates the list with pre-made exercises.
Use case resumes at step 2.
-
-
3a. The given index is invalid.
-
3a1. DukeCooks shows an error message.
Use case resumes at step 2.
-
Use case: UC05 Adding a new diary
MSS
-
User requests to add a new diary
-
A new diary is added with the specified name
Use case ends.
Extensions
-
1a. Diary name already exists.
-
1a1. DukeCooks displays an error message.
Use case ends.
-
Appendix D: Non Functional Requirements
-
DukeCooks should work on any mainstream OS as long as it has Java
11or above installed. -
DukeCooks should be able to hold up to 1000 recipes without a significant reduction in performance for typical usage.
-
A user with above average typing speed for regular English text (i.e. not code, not system admin commands) should be able to accomplish most of the tasks faster using commands than using the mouse.
-
DukeCooks should be able to run with or without internet connection.
-
DukeCooks should not require the user to do any installation.
Appendix E: Glossary
- Mainstream OS
-
Windows, Linux, Unix, OS-X
- Workout
-
A list of [exercise] planned to be done in one session.
- Exercise
-
An activity that works a specific or multiple muscles, usually a repetition of an action.
Appendix F: Instructions for Manual Testing
Given below are instructions to test the app manually.
| These instructions only provide a starting point for testers to work on; testers are expected to do more exploratory testing. |
F.1. Launch and Shutdown
-
Initial launch
-
Download the jar file and copy into an empty folder
-
Double-click the jar file
Expected: Shows the GUI with a set of sample data. The window size will be automatically set to full-screen.
-
F.2. Adding a recipe
-
Adding a recipe while all recipes are listed
-
Prerequisites: List all recipes using the
listcommand. Multiple recipes should be shown in the list. Ensure no recipe in the Recipe Book is named "Chicken Rice". -
Test case:
add recipe n/Chicken Rice i/Chicken i/Rice cal/666 carb/55 fats/44 prot/30
Expected: A new recipe named "Chicken Rice" is added to the Recipe Book. Details of the added recipe are shown in the result display, notably the name and the ingredients of the added recipe. -
Test case:
add recipe n/Chicken Rice i/Chicken i/Rice cal/666 carb/55 fats/44 prot/30(A repeat of the previous test case)
Expected: No recipe is added. Error message is shown in the result display. Status bar remains the same. -
Other incorrect add commands to try:
add recipe,add recipe n/<name>(where <name> is the only specified parameter)
Expected: Similar error messages to previous.
-
F.3. Deleting a recipe
-
Deleting a recipe while all recipes are listed
-
Prerequisites: List all recipes using the
listcommand. Multiple recipes should be shown in the list. -
Test case:
delete recipe 1
Expected: First recipe is deleted from the list. Details of the deleted recipe are shown in the result display. Any meal plan containing the first recipe should also have the recipe removed from the meal plan. -
Test case:
delete recipe 0
Expected: No recipe is deleted. Error message is shown in the result display. Status bar remains the same. -
Other incorrect delete commands to try:
delete recipe,delete recipe x(where x is larger than the list size)
Expected: Similar error messages to previous.
-
F.4. Editing a recipe
-
Editing a recipe while all recipes are listed
-
Prerequisites: List all recipes using the
listcommand. Multiple recipes should be shown in the list. Ensure no recipe in the Recipe Book is named "Chicken Rice". -
Test case:
edit recipe 1 n/Chicken Rice
Expected: First recipe from the list is edited. Details of the edited recipe are shown in the result display, notably the name and ingredients of the edited recipe. Any meal plan containing the first recipe should also have the recipe removed from the meal plan. -
Test case:
edit recipe 0
Expected: No recipe is edited. Error message is shown in the result display. Status bar remains the same. -
Other incorrect edit commands to try:
edit recipe,edit recipe x(where x is larger than the list size)
Expected: Similar error messages to previous.
-
F.5. Adding a meal plan
-
Adding a meal plan while all meal plans are listed
-
Prerequisites: List all meal plans using the
listcommand. Multiple meal plans should be shown in the list. Ensure no meal plan in the Meal Plan Book is named "Vegetarian Plan". -
Test case:
add mealplan n/Vegetarian Plan
Expected: A new meal plan named "Vegetarian Plan" is added to the Meal Plan Book. Details of the added meal plan are shown in the result display, notably the name and the recipes of the added meal plan. -
Test case:
add mealplan n/Vegetarian Plan(A repeat of the previous test case)
Expected: No meal plan is added. Error message is shown in the result display. Status bar remains the same. -
Other incorrect add commands to try:
add mealplan,add mealplan n/<name>(where <name> is non-alphanumeric, or longer than 40 characters)
Expected: Similar error messages to previous.
-
F.6. Deleting a meal plan
-
Deleting a meal plan while all meal plans are listed
-
Prerequisites: List all meal plans using the
listcommand. Multiple meal plans should be shown in the list. -
Test case:
delete mealplan 1
Expected: First meal plan is deleted from the list. Details of the deleted meal plan are shown in the result display. -
Test case:
delete mealplan 0
Expected: No meal plan is deleted. Error message is shown in the result display. Status bar remains the same. -
Other incorrect delete commands to try:
delete mealplan,delete mealplan x(where x is larger than the list size)
Expected: Similar error messages to previous.
-
F.7. Editing a meal plan
-
Editing a meal plan while all meal plans are listed
-
Prerequisites: List all meal plans using the
listcommand. Multiple meal plans should be shown in the list. Ensure no meal plan in the Meal Plan Book is named "Vegetarian Plan". -
Test case:
edit mealplan 1 n/Vegetarian Plan
Expected: First meal plan from the list is edited. Details of the edited meal plan are shown in the result display, notably the name and recipes of the edited meal plan. -
Test case:
edit mealplan 0
Expected: No meal plan is edited. Error message is shown in the result display. Status bar remains the same. -
Other incorrect edit commands to try:
edit mealplan,edit mealplan x(where x is larger than the list size)
Expected: Similar error messages to previous.
-
F.8. Adding a task
-
Adding a task while all tasks are listed
-
Prerequisites: List all tasks using the
goto dashboardcommand. Multiple tasks are in the list. -
Test case:
add task tn/ Project meeting at COM1 td/ 12/12/2019
Expected: A new task named "Project meeting at COM1" is added to the list. Details of the added task is shown in the result display. -
Test case:
add task tn/ Project meeting at COM1 td/ 12/12/2019(A repeat of the previous test case)
Expected: No task is added. Error message is shown in the result display. Status bar remains the same.
-
F.9. Deleting a task
-
Deleting a task while all tasks are listed
-
Prerequisites: List all tasks using the
goto dashboardcommand. Multiple tasks are in the list. -
Test case:
delete task 1
Expected: First task is deleted from the list. Details of the deleted task is shown in the result display. -
Test case:
delete task 0
Expected: No task is deleted. Error message is shown in the result display. Status bar remains the same. -
Other incorrect delete command to try:
delete diary x(where x is larger than the list size)
Expected: Similar error messages to previous.
-
F.10. Editing a task
-
Editing a task while all tasks are listed
-
Prerequisites: List all tasks using the
goto dashboardcommand. Multiple tasks are in the list. -
Test case:
edit task 1 tn/Lunch meeting
Expected: First task is edited to the new task name. Details of the edited task is shown in the result display. -
Test case:
edit task 1 tn/Lunch meeting!
Expected: No task is edited. Error message is shown in the result display. Status bar remains the same. -
Other incorrect edit command to try:
edit task 1 tn/ y(where y contains more than 35 characters)
Expected: Similar error messages to previous. -
Test case: `edit task 1 td/31/11/2019
Expected: No task is edited. Error message is shown in the result display. Status bar remains the same. -
Other incorrect edit command to try:
edit task 1 tn/ 29/2/2019(2019 is not a leap year; February only has 28 days)
Expected: Similar error messages to previous.
-
F.11. Adding a diary
-
Adding a diary while all diaries are listed
-
Prerequisites: List all diaries using the
listcommand. Multiple diaries are in the list. -
Test case:
add diary n/ Yummy Food
Expected: A new diary named "Yummy Food" is added to the list. Details of the added diary is shown in the result display. -
Test case:
add diary n/ Yummy Food(A repeat of the previous test case)
Expected: No diary is added. Error message is shown in the result display. Status bar remains the same. -
Other incorrect add commands to try:
add diary n/ <name>(where <name> already exists in the diary list)
Expected: Similar error messages to previous.
-
F.12. Deleting a diary
-
Deleting a diary while all diaries are listed
-
Prerequisites: List all diaries using the
listcommand. Multiple diaries are in the list. -
Test case:
delete diary 1
Expected: First diary is deleted from the list. Details of the deleted diary is shown in the result display. -
Test case:
delete diary 0
Expected: No diary is deleted. Error message is shown in the result display. Status bar remains the same. -
Other incorrect delete commands to try:
delete diary,delete diary x(where x is larger than the list size)
Expected: Similar error messages to previous.
-
F.13. Editing a diary
-
Editing a diary while all diaries are listed
-
Prerequisites: List all diaries using the
listcommand. Multiple diaries should be shown in the list. Ensure no diary in the diary list is named "Asian Food". -
Test case:
edit diary 1 n/ Asian Food
Expected: First diary from the list is edited. Details of the edited diary are shown in the result display, notably the name of the edited diary. -
Test case:
edit diary 0
Expected: No diary is edited. Error message is shown in the result display. Status bar remains the same. -
Other incorrect edit commands to try:
edit diary,edit diary x(where x is larger than the list size)
Expected: Similar error messages to previous.
-
F.14. Deleting a page
-
Deleting a page from a specified diary
-
Prerequisites: List all diaries using the
listcommand. "Yummy Food" exists in the diary list and has at least one page. -
Test case:
delete page 1 n/ Yummy Food
Expected: Page 1 of the diary named "Yummy Food" will be deleted. Details of the deleted page is shown in the result display. -
Test case:
delete page 0 n/ Yummy Food
Expected: No page is deleted. Error message is shown in the result display. Status bar remains the same. -
Other incorrect delete commands to try:
delete page,delete page 1 n/ <name>(where <name> does not exists in the diary list)
Expected: Similar error messages to previous.
-
F.15. Deleting an exercise
-
Deleting an exercise from the exercise list
-
Prerequisites: List all exercises using the
listcommand. "Pushups" exists in the exercise list. -
Test case:
delete exercise 1
Expected: Exercise "Pushups" is deleted. Details of the deleted exercise is shown in the result display. -
Test case:
delete exercise 0
Expected: No exercise is deleted. Error message is shown in the result display. Status bar remains the same. -
Other incorrect delete commands to try:
delete exercise,delete exercise <index>(where <index> does not exists in the list)
Expected: Similar error messages to previous.
-
F.16. Saving data
-
Dealing with missing/corrupted data files
-
Identify the file that is causing the error.
It should be one of the following:-
.\data\dashboard.json -
.\data\diary.json -
.\data\exercises.json -
.\data\healthrecords.json -
.\data\mealplans.json -
.\data\recipes.json -
.\data\userprofile.json -
.\data\workouts.json
-
-
After identifying the file that causes the error, delete that particular data file.
By deleting the data file, a new data file will be generated from the SampleUtil corresponding
to the file that was deleted.